Disable Screensaver

This post about how to disable screensaver provides quick, easy and dirty ways with which you or anybody else (like system administrator) can disable the screensaver on the windows computer you are running. Information provided on this post contains information related to specific windows operating system and generic information as well which applies to all windows operating systems including Windows 8, Windows 7, XP, Vista, Windows 2000, etc. Once the Screensaver is disabled successfully using any of the methods and you leave you windows computer inactive or idle, your screensaver will not startup automatically and in case the screensaver is configured to display a lock screen when anybody tries to access your windows computer, that lock screen will not appear. Whatever method you choose to disable the screensaver, you must test whether the method worked fine or not on your windows computer.

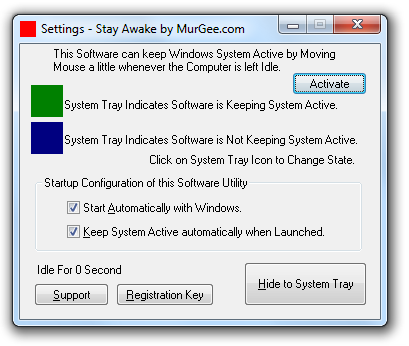
The easiest way to disable screensaver for signed on user or for all users on the computer is to use a 3rd party free to try out software utility. The MurGee Stay Awake Utility can Prevent ScreenSaver Activation by keeping the computer active, is a standalone application and does not requires admin rights for installation. All you need to do is download the utility, save it to some location on your computer and run it, that’s it and you screensaver would get practically disabled as long as the utility is keeping your windows system active. The Stay Awake Utility is as displayed below and works fine on all windows versions from Windows XP onwards to Windows 8.
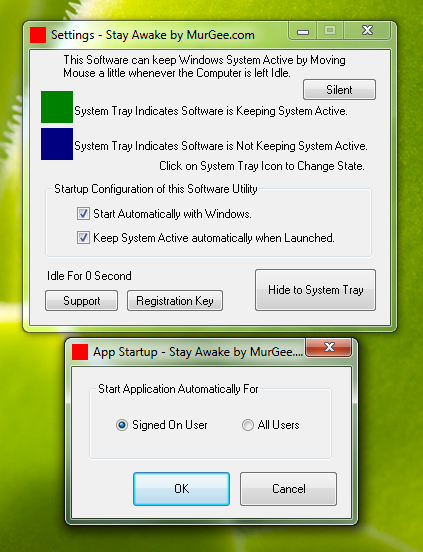
Disable ScreenSaver on a Windows Computer for Single or All Users

Disable ScreenSaver on a Windows Computer

The next way to disable screensaver requires access of Registry & you must know how to navigate and find your way into the regedit.exe and understanding that modifying registry must be done with care and possibly with appropriate supervision. In order to disable the screensaver, you would need to open up the regedit.exe, navigate to the HKEY_CURRENT_USER\Control Panel\Desktop key from the left hand side of the Registry tree and then look for the ScreenSaveActive Key on the Right Hand side and change it’s value to 0. This Registry Change would disable the screensaver for the signed on user and in order to verify whether the screensaver has been disabled or not, logoff and sign on again on your windows computer, leave the computer idle and check whether the screensaver gets launched automatically or not.
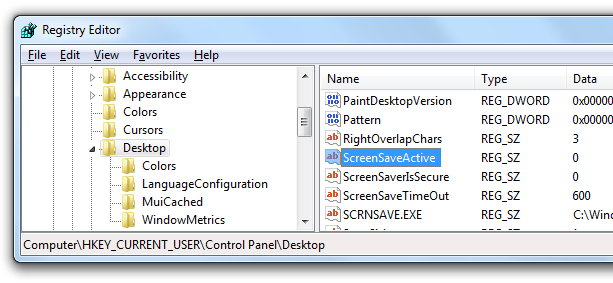
Use Registry to Disable ScreenSaver on a Windows Computer

Use Registry to Disable ScreenSaver on a Windows Computer

Another option to disable screensaver is by using Group Policy Editor and this can be useful to control the screensaver functionality for multiple users. The Group Policy Settings allow to hide the screensaver settings from control panel, allows you to configure no screensaver option, allows you to specify a screensaver file as the default and only screensaver a user can use and allows to set password on all screensavers.
Windows 8 Tips and Tricks

Windows 8 has introduced a new way in which applications on a Windows 8 desktop can run and has named such applications as Metro Style Applications. For Windows 7, Vista, and other Microsoft Windows Users this new metro style applications and the Metro Screen is definitely a new thing to handle. This post outlines few useful tips and tricks for Windows 8 users. All the information provided here has been verified on currently available latest version of Windows 8 . As and when Microsoft releases the final version of Windows 8, the tips and tricks provided in this post should stand valid as all the tips and tricks are really useful features in Windows 8.

  • Right Click on the Bottom Left Corner of the Screen to view a Control Panel Menu to easily open up various control panel items. You can alternatively use the Control Panel Menu Software on Windows 8, Windows 7 and other versions of Microsoft Windows to access similar menu from a System Tray Icon.
  • Left Click on the Bottom Left Corner of the screen to switch from Metro Start Menu and your Desktop. You can alternatively press the Windows Key on your keyboard to switch between Metro and Desktop of Windows 8.
  • Left Click on Top Left Corner of the screen to cycle through all the open Metro Applications and Desktop of Windows 8. Unlike left click on the bottom left corner, a left click on the top right corner can be handy to know which metro applications are running in background and allow you to easily switch between various metro applications.
  • When Metro Start Menu is displayed, you can do a left click on the bottom right corner to change size of icons of metro applications installed on your Windows 8 computer. On the other hand, in case your desktop or any other application is visible when you left click at the bottom right corner, you will be able to cycle through active application and desktop.
  • Metro Start Menu on Windows 8 is displayed on One Monitor and in case you are using dual or multiple monitors connected to your windows 8 computer, you will be able to move the metro start menu to any of the connected monitors using a left click on the icon displayed on the bottom left corner of the taskbar. Yes Multi Monitor Taskbar of Windows 8 is one of the most important feature of Windows 8 and combined with Metro Applications on Windows 8, you can get the maximum output from your Windows 8 computer.

All the tips and tricks provided above have been tested when the taskbar of Windows 8 was at the bottom corner of the screen. In order to effectively use your Windows 8 computer with Metro Start Menu, you need to remember that Metro Start Menu is different and traditional taskbar is different. Feel free to browse this website for more information about what’s new in windows 8 or download windows 8 on your own computer for free from Microsoft and enjoy the new features.

Capture Screenshot Windows 8

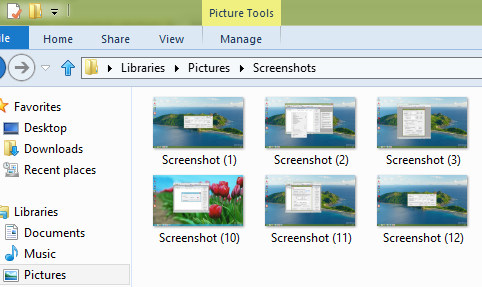
In order to capture screenshot in Windows 8 without the use of any other 3rd party software, you need to locate the Prt Scr & Windows buttons on Keyboard. You should also know how to open up Windows Explorer and navigate to the Pictures Folder in order to easily capture screenshot in Windows 8. Whether you want to take a screenshot of Desktop or any Metro Application running on your Windows 8 computer, the key combination Windows Key + Prt Scr works fine and saves an image file in the Screenshots folder of Pictures Library.

Windows 8 Screenshots Folder in Pictures Library

Windows 8 Screenshots Folder in Pictures Library

Whenever you want to capture screenshot of total screen, all you need to do is press the Windows Key on your Keyboard and press the Prt Scr button on your keyboard one time and wait for a little. Windows 8 will display a transparent blank window for couple of seconds and will save a .png file in a folder named as Screenshots in the Pictures Library as displayed above in the screenshot. The above screenshots have been captured on Latest Version of Windows 8 using the Windows Key + Prt Scr Method.

Capturing a Screenshot on a Windows computer can be really helpful when you want to communicate something visually to anybody else. In older version of Windows like Windows 7 etc, capturing screenshot was indeed a difficult procedure (press Prt Scr to copy the screenshot to clipboard, locate and open up an image editor, paste the clipboard contents and then save the screenshot file) and lots of Screenshot Capture Software Application surfaced on web. Windows 8 uses numbers to differentiate the screenshots captured as displayed above. Even if you delete or rename some file, the next screenshot captured on Windows 8 will be named according to the next number stored internally by Windows 8. Size of the screenshot captured will depend on resolution of your monitor and color depth set for your display.

Mac for Windows Users

Windows Users have enjoyed the flexibility of hardware and popularity of Microsoft Windows. Mac users on the other hand do have a brilliant operating system, but they are sort of limited by the hardware provided by Apple. Custom made computer are popular for Windows with a large variety of selection of MotherBoards, Processors, RAM, etc and the new Operating System of Microsoft i.e. Windows 8 is going to enhance the usability of Windows Computers to large number of other unexplored areas. Apple on the other hand is coming up with new version of Mac named as Mountain Lion with Version Number 10.8 and just like Microsoft they have already released a developer preview of Mountain Lion to developers and Microsoft has also released the latest version of Windows 8 and labelled it as Windows 8 Release Preview.

Mac for Windows users irrespective of Windows Version can be a little bit different experience. Mac’s default browser is Safari and Google Chrome is also popular on Mac as it is popular on Microsoft Windows. The term Desktop is used on both Mac and Windows Computers , however on Mac the desktop icons are aligned to the right hand side as compared to left hand side on Windows. The post Windows to Mac provides lots of useful information to migrate from Windows to Mac and provides lots of tips and tricks for using Mac. There are lots of common things between Mac and Windows and there are lots of functionality differences in which Mac users use their Macintosh computers.

Desktop Background, ScreenSaver, Power Saving functionality, User Accounts protected with User Name and Password are few of the common things between Mac and Windows. You can even share data between Mac and Windows, but you do need to understand that the exe files of windows are of no use on Mac. Text, Images and other file formats which are common in between Mac and Windows can be used. Apple releases software applications for Windows users and Microsoft releases applications for Mac Users. Microsoft Office for Mac is one such software released by Microsoft for users using Macintosh computers and Apple also provides lots of applications like iCloud to share data of Apple products to Windows Computers. In case you are a Windows user looking forward to use Mac in future, you should be able to easily find your way on Mac computers using your Keyboard, Mouse and other input devices with your basic information about Microsoft Windows. One last thing to add here is that similar to Control Panel in Windows, there is System Preferences in Apple’s Mac.

Windows 8 Latest Version

As of writing this post, the Latest Version of Windows 8 released is named as Windows 8 Release Preview. This latest version of Windows 8 is totally free for everybody to download and try it out. Microsoft is offering Windows 8 download in many formats. In case you just want to try out the latest version of Windows 8 on your pc, you can either download Windows 8 release preview as a .iso file which you can burn it to a DVD using any of the free software applications available from Microsoft or other 3rd party software providers. In case you are currently using Windows 7, then you can use the Microsoft’s free DVD burning tool and turn an empty DVD to Windows 8 DVD easily.

During Setup of Windows 8 you would have to enter the Windows 8 Serial or Registration Key which Microsoft is also providing for free. Technically speaking there are two formats of Windows 8 Release Preview. One is 32 bit version of Windows 8 and other is 64 bit version of Windows 8. Microsoft uses the feedback from Windows 8 to know how people are using Windows 8 and will try to deliver Windows 8 with best possible features. Author of this post downloaded Windows 8’s iso file used the product key TK8TP-9JN6P-7X7WW-RFFTV-B7QPF which Windows 8 setup was asking at the beginning of the Windows 8 setup, also author installed this latest version of Windows 8 on a blank Hard Disk, created two partitions out of the 1TB hard disk capacity and the setup of Windows 8 was really easy and quick to follow. Only one reboot was required to install this latest version of Windows 8 onto a blank hard disk on a I7 2600 Computer running with 16 GB of RAM.

In case you just want to know how Windows 8 will appear and what features will it provide, you might wish to skip the downloading and installing part. Many websites publish Windows 8 Screenshots and even videos as well. Yes looking at Windows 8 screenshots is different as compared to actually using Windows 8 with keyboard, mouse and other input methods, but this can save you lots of time and efforts. This latest version of Windows 8 is offered in many other languages apart from English including Chinese, French, German, Japenese, Russian , etc. Microsoft recommends a processor of 1 gigahertz or faster for Windows 8, but in case you are planning to have a new Windows 8 computer, do go ahead and get the best possible processor, motherboard and plenty of RAM so that you can actually enjoy the latest features of Windows 8 named as Windows 8 Metro Applications and of-course other Desktop Applications on Windows 8.

Prevent Screensaver Activation

Now you can easily prevent screensaver activation or disable it temporarily or permanently and prevent it from starting up after preconfigured duration. The Software utility presented here simulates minimal mouse movements when computer is left inactive or idle. You can even store this software utility on a USB drive and whenever you plugin the usb, you computer will be kept active automatically. This software works fine on Windows 8, Windows 7, Windows Vista, for 32 and 64 bit versions. There are few configurable options for this software program and are really easy to use and configure.

Prevent Screensaver from Starting up on a Windows Computer

Prevent Screensaver from Starting up on a Windows Computer

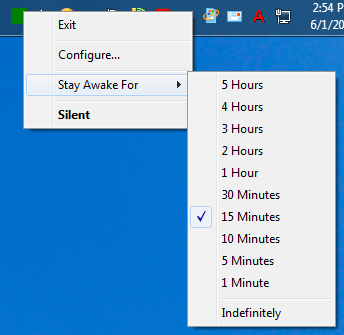
Download and try out this software utility which has minimal settings to control a windows computer’s activity. In order disable screensaver temporarily, you do not actually need to modify computer’s screensaver settings or struggle with complex control panel settings. There is an indicator on the software about idle time and reads in minutes and hours. You can configure the software to startup automatically with windows or you can disable the automatic startup easily as well. The time duration for which you want the screensaver to be inactive can be controlled using the system tray menu as displayed below.

Configure Duration for which you want the Screensaver to disable / prevent

Configure Duration for which you want the Screensaver to disable / prevent

This Software does not changes any screensaver settings in registry and does not requires any installation or not even admin privileges on your computer. The Software indicates using change in system tray icon, whether it is keeping the windows computer active or not. Once you close the software, your computer’s default settings will be applicable. While this software is keeping the system active, the screensaver (if configured) will not activate. You can download and try out this software for free and give your windows computer. In case you are looking for a more sophisticated and controlled software, have a look at Auto Mouse Mover which provides lots of configurable parameters. The Screensaver activation will return to original settings once this software is closed, configured time duration expires or you manually stop the software preventing screensaver activation.

Disable Mouse Left, Right or Middle Click in Windows

Now it is easy to disable any specific mouse click in windows. The software presented here can be used to disable left, right or middle mouse click on windows. Let’s say you disable right click using the software utility presented here, it will be disabled on all the softwares, browsers or even on desktop. Yes the mouse click disabled with this software is sort of global mouse click disable. Whenever you want to enable the disabled mouse click type on your windows computer, all you need to do is either close the software utility or just uncheck the appropriate checkbox on the software graphical user interface.

Download and try out quick and easy way to disable any type of mouse clicks. The Software presented here is named as Mouse Disabler and works fine on all 32 bit and 64 bit windows operating systems. Yes you can disable mouse clicks on Windows 8, Windows 7, Windows Vista and even on Windows XP. Yes this software utility does requires a small installation but all the files distributed by the software have been tested with lots of antiviruses and does not contain any type of malware.

In order to disable and enable mouse clicks, all you need to do is make your decision and use this Mouse Disabler. Anything disabled or blocked by this software will get automatically enabled when this software is closed. Another important piece of information is that you can use Mouse and Keyboard to interact with Mouse Disabler. With focus on any of the checkbox, the spacebar button on keyboard can be used to change the state of checkbox. Moving focus to other controls can be done by pressing the Tab button on Keyboard. Right Click of Mouse can be simulated using the Keyboard Shortcut Shift + F10 and mouse movements and left clicks can be done using MouseKeys (which is a Microsoft Windows Feature). You can even use control panel to swap Left and Right Mouse clicks. Yes there are lots of things you can do with Windows, but disabling Mouse Clicks is something that is not controllable using Windows Control Panel and this Mouse Disabler presents quick and easy way to disable mouse click and allows you to easily enable them back. In order to try out this software utility on your windows computer, you need to download and install the Mouse Disabler and then just enable or disable mouse clicks easily, quickly and safely on windows laptop or desktop computer.

New Windows 8 Computer

Planning to get a new desktop or laptop with Windows 8 in it or planning to build a custom machine for yourself, do consider a motherboard with USB 3.0 ports. Yes Windows8 supports USB 3.0 devices natively and data transfer speed between computer and external device with usb 3.0 is way much higher than with USB 2.0 devices. In case you are planning to install windows 8 on your existing computer, you can try it and download it for free from Microsoft website now. You can get higher data transfer speed by connecting a pci express card to your desktop computer. USB 3.0 devices are not very much popular right now but with Windows 8, usb 3.0 can totally replace usb 2.0 devices.

Whether you want to install windows 8 on to your computer using a usb device, use a usb stick as ram to speed up your windows computer or even just transfer data to and from your computer to usb devices, you must consider upgrading to a usb 3.0 compatible computer or if you are planning to have a new computer with windows 8 on it, check out whether it supports usb 3.0 or not. Fast data transfer can really speed up your work and ofcourse save you time.

A new computer with Windows 8 installed on it and with support of usb 3.0 can really speed up your work. There are good chances that you would not need to install any external driver or other software if you do buy a usb 3.0 compatible motherboard / laptop and your usb 3.0 devices will work really fast. Windows 8 brings new metro applications which is a really great development by microsoft and in order to fully enjoy the features of windows 8, do consider upgrading your system or if you are looking to get a new computer, spend some time doing research and you may find a better computer only for few extra $s. Amount of RAM, USB 3.0 support, Hard Disk Capacity, Processor Speed, Graphics Card, etc are few of the important electronic considerations while choosing a new desktop or laptop computer.

Auto LogOff Windows Computer after Inactivity for all users

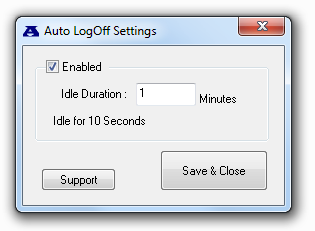
The Auto LogOff Software utility presented here can be used to automatically log off any signed on user on a windows computer once the windows computer has been left idle. This is a really small and handy utility which can be used to control the state of idle computers easily. The Log Off or Sign Off initiated by this software utility is forced which in other words means that when any user configured on a particular windows computer leaves the computer idle or inactive and no software is keeping the windows computer active, this Auto LogOff utility can automatically log off the user. The software allows to configure whether the auto log off functionality is enabled or it is disabled. You can even configure the number of minutes after which the signed on user must be logged off automatically.

Automatically LogOff Signed on User after inactivity

Automatically LogOff Signed on User after inactivity

Download and try out this Auto Log Off software utility on your Windows Computer. This utility works good on Windows 8 , Windows 7, Windows Vista, Windows 2000 and other 32 bit and 64 bit windows operating systems. Whether single user signs onto the computer or multiple users sign on to the computer, this utility will be started automatically for all users signed onto the computer on which this Auto LogOff utility is installed.

Automatic Forced Log Off after inactivity ensures that if any of the signed on user leaves the computer, the user will be signed out automatically. Yes any unsaved data will be lost and hence care must be taken while using this nifty utility on windows computers. Yes you can even get changes done to the Auto LogOff software by writing to the support team. The trial works good for upto 20 times and after the free trial limitations are used, the software will prompt you to register your copy. The Auto Mouse Mover software can keep the windows computer active by simulating mouse movements and if any other such software keeps the computer active, the signed on user will not be logged out.

Color Picker Software Download for Windows

Now it is really easy to pick any color from your desktop screen or from anything that is displayed on your windows computer screen with Color Detector. This software utility can be used to pick screen color pointed by mouse cursor and the color picking can be initiated using a pre-configured keyboard shortcut. This Color Picker also tells the screen location in terms of x and y co ordinates. You can use this multipurpose color picker to pick color or any pixel location as defined by Windows. Whether you are running a single, dual or multiple monitor windows computer, this color picker can pick color of any pixel along with it’s location.

Pick Pixel Color and Location using this Color Picker Software Download

Pick Pixel Color and Location using this Color Picker Software Download

The above screenshot of the Color Picker has been taken on a Windows 7 computer. Yes this software application has been tested on Windows 8 as well and works good on other Windows versions like Vista, XP, etc. One of the unique feature of this software utility is that it remembers it’s location and hence whenever you start the application, it will relocate it automatically at the last position.

Download and try out this color picker software utility for free. The Color Picked by the software utility is displayed in Red, Green and Blue values and also in Hex value. The color is displayed in a small rectangular window for easy identification and confirmation. The Pixel location whose color was picked by this Color Picker is displayed in the top right corner which can be really handy when you want to simulate mouse clicks from a batch file and you want to know the pixel co-ordinates.