Onscreen Keyboard of Windows 8

Almost every Windows version had an onscreen keyboard which allowed users to type on any application using mouse cursor instead of actually using the keyboard. This OnScreen Keyboard in Windows 8 has now got a new look and is more easy and friendly to use. The easiest way to enable the OnScreen Keyboard from Windows 8 Taskbar is to right click on the taskbar , navigate to the Toolbars menu and enable Touch Keyboard as displayed below. This will add an extra Touch Keyboard Icon on the taskbar as displayed in the screenshot given below. Whenever you want to disable or remove the icon, you can use the same procedure and get the Touch Keyboard Icon out of your Windows 8 taskbar.
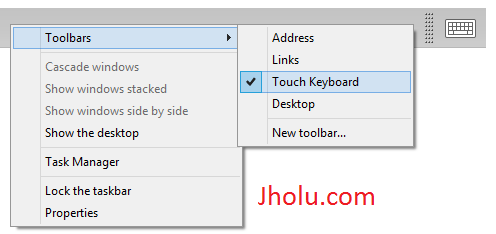
New OnScreen Keyboard of Windows 8 labelled as Touch Keyboard of Windows 8

New OnScreen Keyboard of Windows 8 labelled as Touch Keyboard of Windows 8

Once you do have the Touch Keyboard Icon visible on your Taskbar, you can click on it once to view the Touch Keyboard and use it to type using mouse clicks instead of key press. In case you do have a working keyboard attached to your Windows 8 computer and you press any key on your keyboard, the new OnScreen Keyboard of Windows 8 will hide automatically.

New OnScreen Keyboard of Windows 8 named as Touch keyboard

Touch Keyboard of Windows 8 provides a better User Interface from the older OnScreen Keyboard of Windows

In case you have already used onscreen keyboard of windows and you still want to use the older interface, you can still use the older version of onscreen keyboard. There are many ways in which you can launch the OnScreen Keyboard Utility in Windows 8, out of which the easiest way is to create a desktop shortcut to the file osk.exe. You can also launch the onscreen keyboard utility using the osk command from the command line of Windows 8 as displayed below.
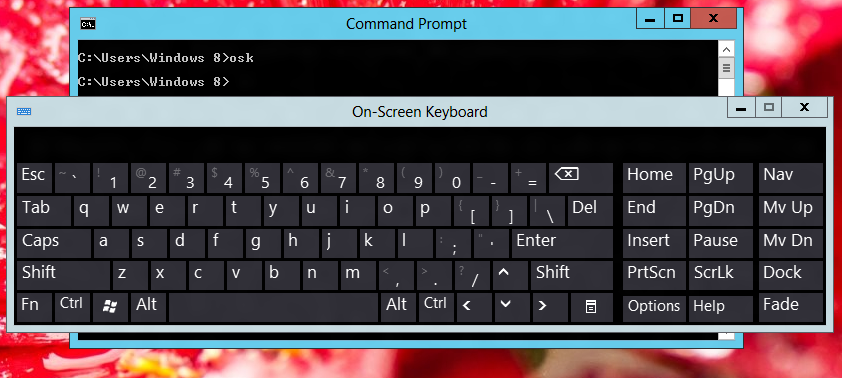
Launch OnScreen Utility to simulate Keyboard Typing with Mouse Clicks on Windows 8

Onscreen keyboard utility of Windows 8 from command line

The above ways to send keystrokes to active application in Windows 8 can be really handy when you do have a broken key on keyboard. One step further, you can find Keyboard Automation Utilities to send keystrokes or even long sentences to active application in windows 8. Visit Ease of Access Center from Windows 8 Control Panel to find out more ways to send input to your Windows 8 Computer.
Text to Speech Software for Windows

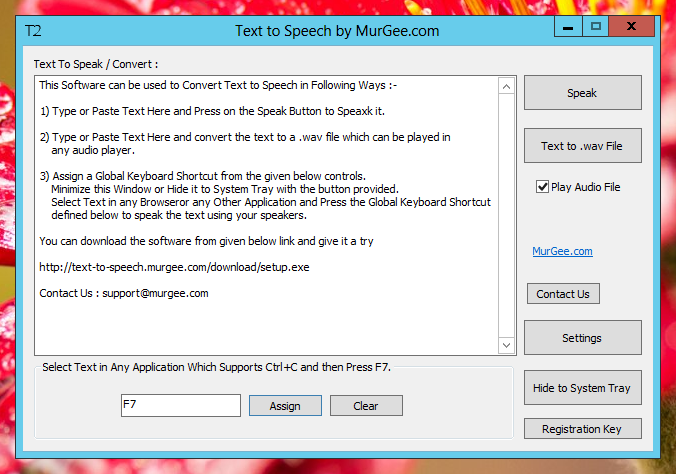
This post presents a unique Text to Speech Software for Windows Computer. This Text to Speech Software can be used to convert text to speech, convert text to a .wav file or to speak selected text in any application using your computer speakers. Given below screenshot is the main screen of this text to speech software which is totally free to try out on a Windows computer. The Voice spoken or converted by the software can be configured from the control panel.

Speak Selected Text, Convert Text to audio file with simple and easy to use Text to Speech Software

Speak Selected Text, Convert Text to audio file with simple and easy to use Text to Speech Software

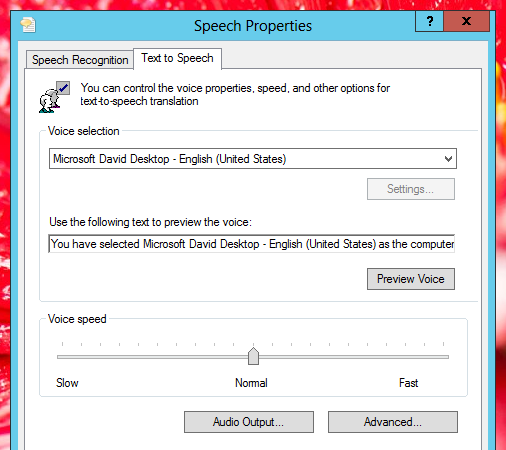
Download and try out this multipurpose text to speech software for free. This Software has been tested on Windows 8, Windows 7 and will be tested on other versions of Windows including Windows Vista, Windows XP, etc. The Voice spoken or converted by this software is configurable from Control Panel. The button labelled Settings on the software’s main screen can be used to launch the Text to Voice Control Panel Applet as displayed below.

Control Speech Properties using Speech Icon from Control Panel

Speech Panel of Windows 8 to Configure Text to Voice

In order to read selected text aloud using your speakers, you need to configure a global keyboard shortcut in the Text to Speech Software Application as displayed in the first screen of this post. Once you have configured / assigned a keyboard shortcut (F7 was assigned to convert text to voice in the software screenshot above), you can minimize the application or hide it to system tray. Now onwards whenever you need to read aloud any text in any application or browser, all you need to do is select the text and press the keyboard shortcut configured. This Text to Speech Application can be really handy whenever you want to :-

  • Convert selected text in any application or browser to voice.
  • Convert text specified to an audio file in .wav file format.
  • Just let the software read the text and convert it to audio streamed through default audio device like computer speakers,. etc.

Best Automation Software for Windows

The selection of Best Automation Software for doing repetitive tasks depends on what type of automation you want to accomplish. Selection of the automation software depends on whether you want some GUI testing to be automated and do some other offline tasks or fill online forms, etc. You can find free trial of various windows automation software downloads and spend lots of time in verifying whether the selected automation software is best for your requirements or you should be looking for some other Windows Automation Software.

Software Screenshots can really give you a great idea of what all any automation software can do for you. In case you can find some video tutorial apart from software screenshots, then yes you can visually check whether the automation software is best for your tasks to be automated. Writing Software applications, testing automation software applications, marketing them , providing support and other stuff requires lots of  efforts and hence the software companies charge you a licence fees. A Generic rule governing prices of any Windows Automation Software is more the functionality they provide, the more they charge.

Automate Windows Tasks with this Cheap and Free to try Windows Automation Software

Automate Windows Tasks with this Cheap and Free to try Windows Automation Software

The Best Windows Automation Software for your needs to fulfill your requirements, must be actively supported, must be appropriately priced, the company should give you a free trial so that you can fully evaluate the software, you should be able to find screenshots, video tutorials, must work on your windows version in 32 bit or 64 bit mode and should work on your target computers, etc. Selection of an automation software is also dependent on how easy is the software to learn and use. A Free trial of Windows Automation Software is not the benchmark for deciding whether the selected software is the best or you still need to look for more.

Windows 8 Control Panel Commands from Command line

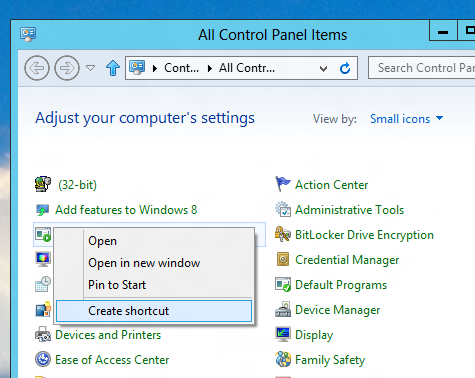
Control Panel is one of the most useful software in Windows 8 which can help you to manage your Windows 8 Computer. Various Control Panel Applets can be launched from command line. You can even create a desktop shortcut to launch a specific Control Panel command. The easiest way to create a desktop shortcut for a specific control panel command is to right click on it and select the menu option to create a shortcut as displayed below.

Create Desktop Shortcut for Control Panel Command in Windows 8

Create Desktop Shortcut for Control Panel Command in Windows 8

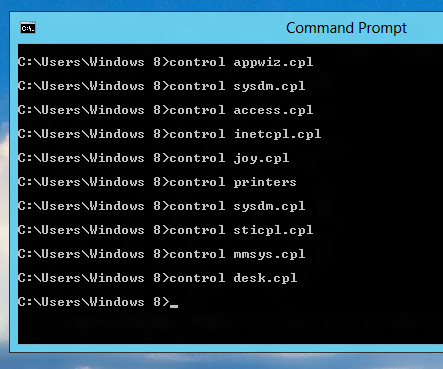
Yes Desktop Shortcuts can be really handy to launch specific Control Panel Command in Windows 8. However there may be a time when you might need to get a way to launch specific control panel command using a command line. In Windows 8 the Control Panel is an application named as Control.exe and can be typically found in C:\Windows\System32 Folder. This Control.exe (which is actually the Control Panel Application of Windows 8) accepts command line arguments. In case you suply invalid argument, the Control Panel Application would not do anything. Without any further explanation, let’s delve into few Control Panel Commands on a Windows 8 Computer.

Screenshot displays how to launch Control Panel Applets using Command Line Arguments

Launch Control Panel Commands from Command Line

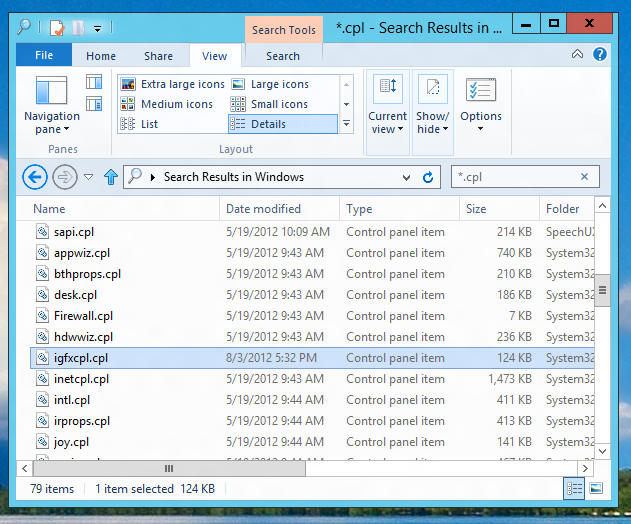
The above screenshot captured on a Windows 8 computer displays few commands launched from Command Line to launch various Control Panel Applets. You do not need to remember them as most of the control panel commands are packaged in a seperate .cpl files which can be found in C:\Windows\System32 folder as displayed below. Depending on whether you are using a 32 bit or 64 bit version of Windows 8, your search results will be different. Also some 3rd party applications create and install .cpl files to provide a quick way to configure application specific functionality.

Control Panel Commands in .cpl files

Windows 8 Control Panel Commands in .cpl files

Utilities to Tune Up Windows 8

Few Utilities for Windows 8 can make this new Microsoft Windows Operating System really easy to use. Tuning up of Windows 8 is required as Microsoft has done some graphical user interface changes and as we all have been using Windows 98, Windows XP, Windows 2000, Windows Vista and even Windows 7, these new changes in Windows 8 do require you to communicate with the operating system differently. There are many things in Windows 8 that can bother you and require changing of practice.

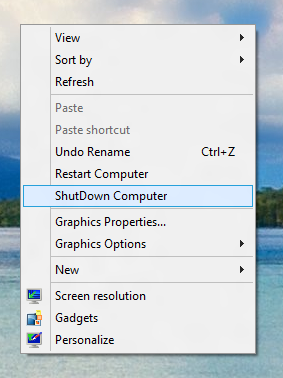
The very first tune up in Windows 8 you might need is the new way in which you need to shutdown your Windows 8 computer. In order to Shutdown Windows 8, you need to Sign Out, Remove the Windows 8 Welcome Screen and then Shutdown using your User’s Name icon. Yes with a little tune up you can Shutdown Windows 8 Computer or even Restart Windows 8 Computer in a really handy and quick way as displayed in the screenshot below. This can really save you time and efforts and Windows 8 Controlling Power of your Windows 8 Computer can be a simple click away with this Windows 8 Utility.

Desktop Menu to Shutdown Windows 8

Desktop Menu to Shutdown Windows 8

The Second Tune Up Utility for Windows 8 can be a really time saver when you are actively working on Desktop. Microsoft introduced new Windows 8 Start Menu and this new Menu is supposed to launch Desktop Applications and Windows 8 Applications. Now while you are working on your Desktop, you can launch new applications or programs using Desktop Shortcuts or Applications pined to the Taskbar. A Windows 8 Tune up Utility allows you to group multiple application shortcuts in a single taskbar icon and can be treated as an Alternative to Windows 8 Start Menu while working on Desktop.

Yes Utilities for Windows do help everybody to make the most out of Windows 8 or any other Operating System. There will be many other utilities listed on this blog which would make using Windows 8 much easier. Another small Windows 8 Tuneup Utility named as Control Panel Menu allows you to add an icon to System tray and the menu displays lots of useful and handy control panel commands. All the utilities presented in this post can really help you to tune up Windows 8 and still enjoy the flexibility of older versions of Microsoft Windows.

Custom Made Software

A Custom Made Software can be useful when you do have a specific task to do and no existing software application fulfill the purpose. Now a days Software Developers are one of the highest paid people. A Custom made software requires lots of other stuff apart from writing code & hence a complete software development requires a software company to employ lots of people to work on a single software development project. Managing complete software development lifecycle often requires lots of planning, writing code for it, testing out the software, deployment of the software, writing help documents and finally providing software training.

In order to get a custom made software, you have lots of choices depending on the size of the software. Here size of the software implies what all the software is supposed to do when it is running. Other factors do come into consideration like which all operating systems your custom made software must run on. Yes a single software made can be compiled to run on different operating systems like Windows, Mac OS X and even on Linux using cross platform software development kits. Web based software applications do have an upper hand in terms of operating system compatibility and yes lots of java based applications are made as well which bridge a gap between a desktop based application and a web based application and providing cross platform compatibility.

Custom made Windows Applications often run on various Windows Operating Systems such as Windows XP, Windows Vista, Windows 7, Windows 8 and other Windows Server operating systems. 32 bit Windows based applications run in 64 bit version of the operating system without recompiling. Depending on specifics of a custom made windows application, there might be some tweaking required so as to make the application work across all other Windows Operating Systems. In case a custom made application uses some specific functionality of a specific operating system, it will not run in lower versions of the Windows. On the contrary, Windows also allows an application to run in compatibility mode of an earlier version of the Operating System, e.g. you can run an application on Windows 8 in compatibility mode of Windows Vista or Windows XP.

Custom made Macintosh Applications also need careful planning. As now a days all latest Mac OS X versions work by default in 64 bit mode, most of the custom made Mac OS X applications are built taking into considerations a 64 bit mode of Apple Macintosh. Depending on the target version of the Mac OS X, a custom made Mac OS X application might be designed to work on Mac Version 10.6 onward only. Similar concerns are applicable for linux software development, differences in 32 bit and 64 bit linux versions, licence agreements and so on.

Applications designed for specific operating system can utilize the services of the target Operating System in a better way, whereas a cross platform application has to take into consideration that it must work on all supported operating systems. The Price for getting a custom made application can depend on the software development company you choose, whether you opt for fixed price model or you pay the software developers a flat monthly fee and other agreements with the software company. There can be lots of benefits of Custom Software Development and depending on the time, efforts and money you spend, you need to decide on whether to use general purpose software or get a custom made software as per your specific requirements.

How to try Windows 8 without Installing

Wanna try out Windows 8 without installing it on your hard drive ? Yes now you can try out new Microsoft’s Operating System without installing it on your hard disk. There are many possible ways in which you can view all the features of Windows 8 or try out Windows 8 yourself. Depending on what you want to do, how much time you have, what’s your internet’s speed and other factors you can decide on your own how to try out this brand new operating system from Microsoft. Given below are few of the ways in which you can know all about Windows 8 and even test various application on Windows 8 without looking for a DVD drive, extra partition in a hard disk, dual boot Windows 8 with your existing Operating System, etc.

The very first way to try out Windows 8 hands on is to download the .iso image file of Windows 8 from Microsoft’s website. Here you need to decide whether you wish to try out 32 bit version or 64 bit version of Windows 8. Once you have decided on the bit version, get a free trial of Windows 8. Download & Install Free VirtualBox Software from Oracle. Install Windows 8 in Virtual Box and test it to your satisfaction and once you are done, delete the files of VirtualBox to claim the hard disk space occupied by the Windows 8. This is the best way to test drive Windows 8 and you can even test your applications whether they run fine or not. Remember you might not be able to test out direct x games and in case your computer does have Virtualisation Enabled, testing out Windows 8 this way would not take very long.

Second way of trying out Windows 8 is to try out this new operating System Online. Yes you will be able to try out Windows 8 online with TechNet Virtual Labs, provided Microsoft follows their own tradition. As of this writing you can try out Windows Vista and Windows 7 Online using Microsoft’s Virtual Labs, which is basically a method of educating people about various features of the operating systems and software applications provided by Microsoft. As of this writing Windows 8 is not yet officially launched and the free trial version is basically targeted towards software developers to test their applications on Windows 8.

Another option to check out various features of Windows 8 is by looking at Windows 8 Screenshots and Videos. Yes looking at Screenshots will not allow you to actually feel this new Operating System, but it would save you time and efforts. In case you do have good internet connection, free space on your hard disk and good computer, the very first option described in this post is the best way to try out Windows 8 without actually installing on your Hard Disk. Installing Windows 8 in VirtualBox keeps all the files of Windows 8 in a single file which you can delete anytime to claim your hard disk space back.

Lock Windows 8 Computer

In order to Lock your Windows 8 Computer, you have lots of options. The very first and easy way to Lock a Windows 8 Computer is to press the Lock Computer Keyboard Shortcut i.e. Windows Key + L Key. You need to press the Windows Key on your keyboard (Either Windows Key on Left Hand Side of Keyboard or on Right Hand Side of Keyboard) and then without releasing it, you need to press the L Key on your Keyboard. Once you have pressed the Windows Key and L Key on your Keyboard, your Windows 8 Computer will get Locked and Windows 8 Welcome Screen will be visible on your Monitor.

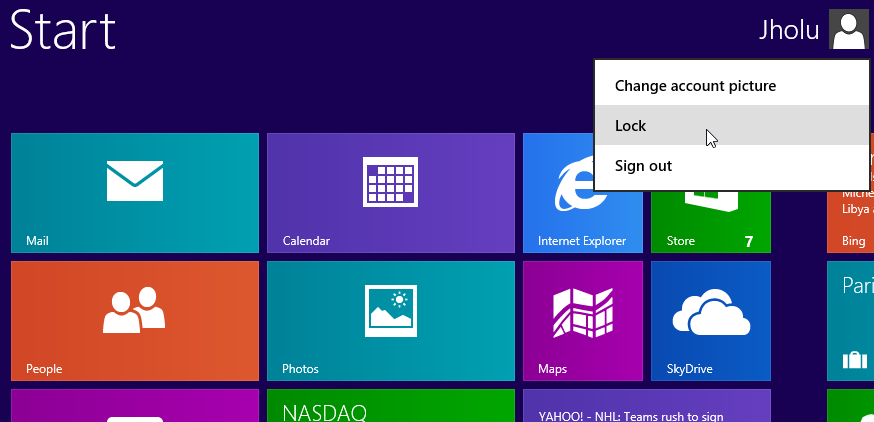
You can also Lock your Windows 8 Computer from Windows 8 Start menu by clicking on your Signed on User Name and then selecting the menu Option to Lock the Computer as displayed in the given below screenshot. Once you click on the Lock menu option, your Windows 8 will display the Welcome Screen and your Windows 8 Computer will get Locked.

Lock Windows 8 Computer from the Start menu of Windows 8

Lock Windows 8 Computer from the Start menu of Windows 8

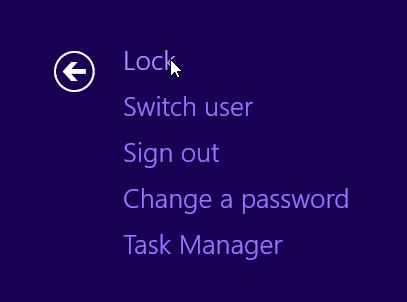
Another way to Lock your Windows 8 Computer is to press Ctrl + Alt + Del and when the new screen appears, select Lock from the options available as displayed below. Pressing Ctrl + Alt + Del and pressing Enter will automatically Lock your Windows 8 Computer and will bring the Windows 8 Welcome Screen.

Lock Windows 8 from Ctrl + Alt + Del Menu

Press Ctrl + Alt + Del and when new screen appears press Enter to Lock your Windows 8 Computer / Workstation

Either way you lock your Windows 8 Computer, your Monitor will display the Windows 8 Welcome Screen and you would be prompted to re-authenticate yourself by providing the locked user’s password. In case you have not set any password, you would still need to click on your user name in order to regain access to your Windows 8 Computer.
In case you would like your Windows 8 Computer to Lock Automatically after configurable minutes, you can try out the software listed at Lock Idle Windows 8 post of this website. Apart from the new Welcome Screen, Start Menu of Windows 8 and new Sign In Options for Windows 8, the security management of Windows 8 remains almost the same as for other versions of Windows Operating Systems. Manual Locking of Windows 8 can be really handy using the first option outlined in this post.

Uninstall Software from Windows 8

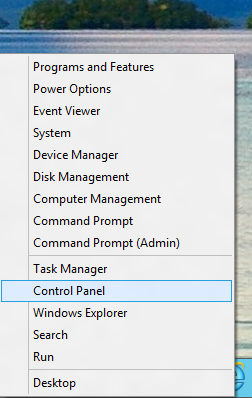
In order to uninstall a software from your Windows 8 computer, you need to follow few steps. There are lots of software types you can uninstall from your Windows 8 computer. Whether you are using a 32 bit Windows 8 computer or a 64 bit Windows 8 computer, the procedure to follow to uninstall something from Windows 8 remains the same. First of all right click at the bottom left corner on your primary monitor or the monitor on which the taskbar is displayed. You will see a popup menu from which you need to select Control Panel and follow other steps.

Screenshot displays how to launch Control Panel on a Windows 8 Computer

Right Click at bottom right Corner and Click on Control Panel Menu Option to Launch Control Panel

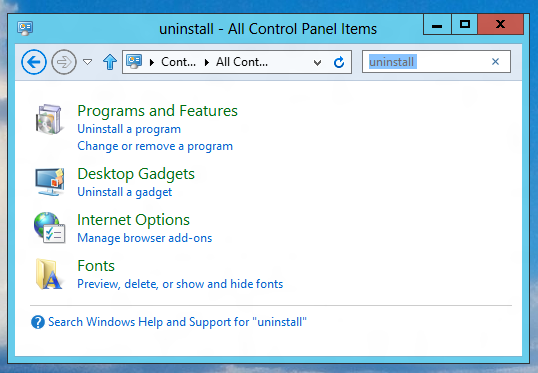
Once you have Control Panel up and running, search for the word uninstall in the Control Panel Search Window. This Action will display you a list of software types you can uninstall from your Windows 8 computer. Given below screenshot displays how the Control Panel on Windows 8 will appear after searching for the word uninstall. This website has a post specifically to Uninstall a Windows 8 Application from the Windows 8 Start Menu or you can follow rest of the steps to uninstall any type of software from your windows 8 computer.

Search for Uninstall in Control Panel of Windows 8 to see what all software types can be uninstalled from your Windows 8 Computer

Search for Uninstall in Control Panel of Windows 8 to see what all software types can be uninstalled from your Windows 8 Computer

As you can see from the above screenshot of Windows 8 control panel, there are lots of software types which you can uninstall from your Windows 8 Computer. You can uninstall a Desktop or Windows 8 Style Application using Control Panel, Uninstall a gadget, uninstall or manage browser add-ons or even delete or hide fonts installed on your Windows 8 computer. Just click on the appropriate link and follow the screen prompts to fully uninstall any software from your Windows 8 computer.

Protect Windows 8 from Viruses

Protecting your Windows 8 Computer from Viruses, Malware or Spyware can be really easy. In order to protect Windows 8 from Viruses, you need to understand how viruses or malware spread. Once you understand that, you can have a Windows 8 Computer up and running without any viruses. Windows 8 is providing lots of stuff so that you can use your computer without being affected by viruses. Once your computer gets infected with viruses, it is really difficult to get the viruses out of your computer. With so many viruses, malware and spyware already existing, it can be really tough to get a clean PC.

Smart Screen Folder is one of the ways in which Windows 8 warns you of a potential dangerous application download. Whenever you try to download and run an application or application setup from internet, Windows 8 will warn you that the application might contain virus or malware as the application does not have a valid signature. Yes this warning can turn out to be a false alarm, but you need to understand that the application you are about to download might contain a malware or virus and you should only skip the Smart Screen Filter warning if you do trust the software publisher.

Windows 8 Defender now protects your computer from Viruses and it does have a real time protection. You can also scan your Windows 8 Computer for possible viruses or spyware using Windows 8 Defender for Virus Scan. Yes even though Microsoft provides inbuilt virus scanner and real time protection with viruses, still there are lots of antivirus software application which you can download. Antivirus applications normally provide you virus protection on the basis of a paid subscription or you can get a free antivirus software for Windows 8.

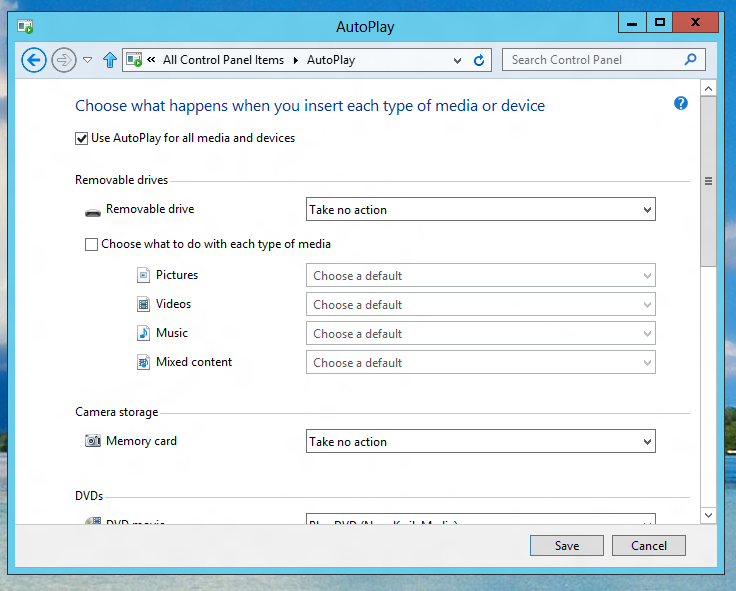
As this post is about providing information on how to protect your Windows 8 computer from viruses, the very first thing that you need to consider is whether you do connect external drives like External hard Drive or USB drives to your Windows 8 Computer. In case you do connect external drives, you should consider disabling the AutoPlay for External Drives using the AutoPlay Control Panel option in Windows 8 as displayed below.

Enable or Disable AutoPlay for External Devices or Media in Windows 8

Disable AutoPlay for External Drives to protect Windows 8 from Viruses

Finally the most important thing to protect your Windows 8 from Viruses is safe Internet Browsing. Windows hosts files provide quick and easy way of blocking websites in all browsers and applications. Do not download and run applications whenever possible from non-trusted publishers. Search Engines are your friend to find out information about any software publisher. Yes Windows 8 does have inbuilt Windows 8 repair option for a computer out of which viruses cannot be removed.