Virus Scan on Windows 8

Viruses are really complex software applications which are designed to do non productive tasks. Yes there are lots of them for Windows Users and Windows 8 is no different than any other Windows Version. Microsoft provides Windows Defender with which you can scan your whole computer or selected folder(s) for viruses and yes you do not need to pay for Windows Defender and Virus definitions are provided by Microsoft for free as well. In order to launch Windows Defender on your Windows 8 computer to scan one or more folder(s) for malware or viruses, open up control panel and search for defender as displayed in the screenshot below. You can alternatively launch Windows 8 defender from the Windows 8 God Mode Folder quickly.
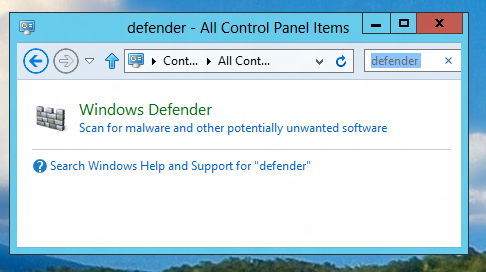
Launching of Windows 8 defender by Searching for the word defender in Control Panel

Launching of Windows 8 defender by Searching for the word defender in Control Panel

Once you have found the Windows 8 Defender in the control panel, scanning of your folder(s) for viruses is really easy and quick. In Windows 8 defender as displayed below, you will have the option to initiate a full system scan, quick scan of viruses or custom folder selection scan. As displayed in the figure below, the virus definitions are updated or your Windows 8 Defender will prompt you to update virus definitions.
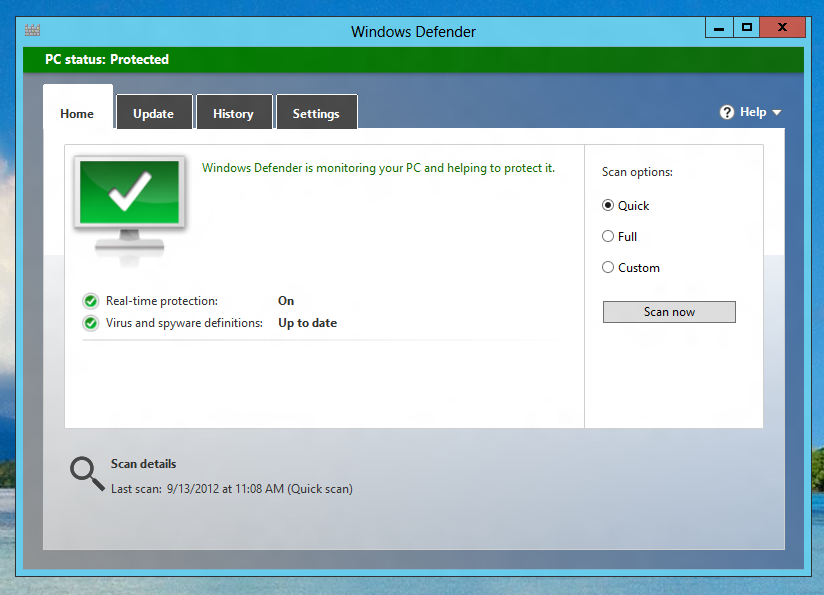
Scan your Windows 8 Computer for Viruses using Windows Defender

Scan your Windows 8 Computer for Viruses using Windows Defender

Although Microsoft is providing Real Time Virus Protection and even auto update virus and spyware definitions for free, you might consider getting a Free AniVirus Software for Windows 8 or better understand how to protect your Windows 8 Computer so that it does not gets infected. Yes if you understand how your Windows 8 computer can possibly get infected with virus or spyware, you will save yourself lots of efforts in struggling with viruses, spyware and malware.

Disable Screensaver Macintosh

Disabling Screensaver temporarily or permanently is now really easy and quick with the new Free to try out Mouse Automation Tool. This Screensaver disabler software for Macintosh actually moves mouse cursor. Now when Macintosh sees that the Mouse Cursor is being moved, it thinks that some user is actively moving the mouse cursor and hence even after idle time has passed, the Macintsoh does not launches the ScreenSaver (as Configured). There are many advantages of using this mouse moving method on mac to disable the screensaver or other idle time based activities. Have a look at the given below screenshot and notice how the software utility presented here is really configurable and gives you total control over your Macintosh’s Idle Time.

Disable Screensaver Activation of Screen blankout on your Macintosh

Disable Screensaver Activation of Screen Blankout on your Macintosh with this Mouse Automation Sotfware

With this Macintosh Mouse Automation Tool, you can select for how long you want your Macintosh to remain Active and prevent any idle time activities like automatic launching of screensaver, blanking out your Mac Screen, or even any other automated activities configured on your Mac. All you need to do is from the System Tray, Select the New Activation Time and that’s it. Whenever you select a time duration from the System Tray Icon and Menu of the Software, the internal clock of the software starts running and times out after the selected duration has passed.  In case you specify that your Mac must be kept active for infinite time, the timer jiggling the mouse cursor will not time out and will keep on jiggling the mouse which in turn will disable screensaver. There are no System Settings changed from this Mac Mouse Automation Software .

Macintosh requires you to actually click mouse or press a key on keyboard in order to wake up a Mac Screen from temporary sleep, and a Windows Computer’s Screen wakes up with simple mouse movement as well apart from mouse click and typing on keyboard. In case you are also using a Windows Computer, you can Disable ScreenSaver on your Windows Computer as well. This Mac Automation Tool works on Macintosh Version 10.5 onwards and you can download it right now. On Mac Mountain Lion, you would need to prevent Gatekeeper from stopping this software installation. Download the software on your Mountain Lion and launch it using right click menu on the downloaded application and then allow the setup to run. Once the setup of this Macintsoh Application completes, it automatically opens up a tutorial and you can launch the software from Applications Folder of the Finder.

Scanning in Windows 8

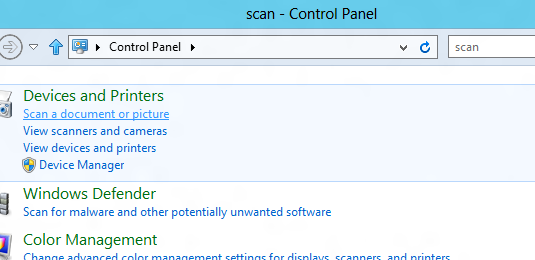
Scanning a Document or Picture is easy in Windows 8. Yes you do not need to use any external software and you can simply use the built in features of Windows 8 to scan documents or pictures in color or in gray scale. In order to scan a document or picture on Windows 8, connect your scanner using USB 2.0 or USB 3.0 connector to your Windows 8 computer and power it on. Now open up control panel and search for scan as displayed in the screenshot below.

Search for the word Scan and Select the Scan Document or Pictures from the list of Options

Scaning without any 3rd party software on Windows 8

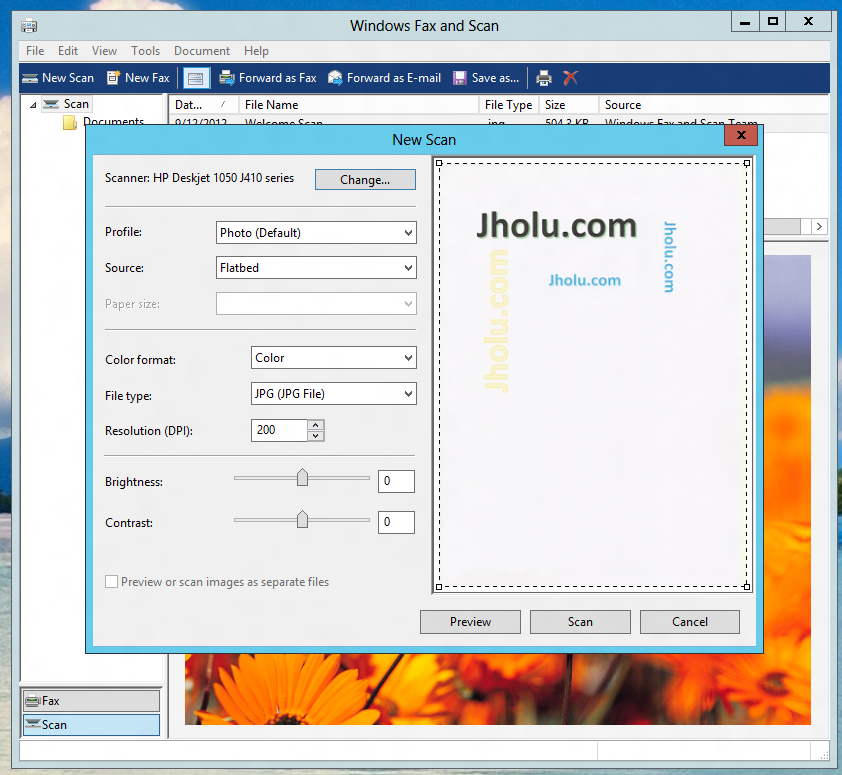
From the list of options that popup, have a close look at the heading Devices and Printers and then notice a link saying Scan a document or picture and then click on it. This will open up a new window which is sort of scanned documents manager and also fax manager. Here you can scan or preview documents or pictures stored in various image file formats such as .bmp, .png, .tif or even in a .jpg file format.

Manage Scanned Documents in Windows 8 or manage existing scanned documents on your Windows 8 Computer

Scanning and Fax Management in Windows 8

In the above screenshot of Scan and Fax Management control panel applet, a A4 size paper has been previewed. Windows 8 also allows you to either scan in color, gray scale or even in black and white. Resolution of the scanned image in Windows 8 is also configurable and remember higher the resolution you specify in terms of DPI (Dots Per Inches), bigger your image file is going to be and more the time each scan will take. Brightness & Contrast of the scanned image can also be changed. You can even send the scanned documents in Windows 8 by email using the default EMail Client installed on your Windows 8 computer.

Linux Auto Clicker

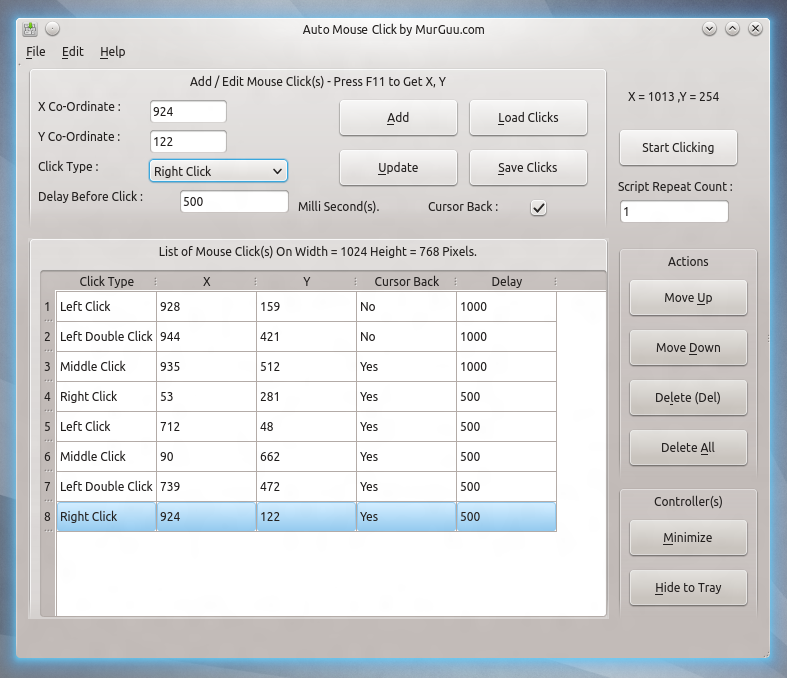
Linux Automation Tool for GUI Testing is presented in this post. The Linux Auto Clicker software presented here is a versatile Linux Automation Tool which can be really useful when you wish to automate Mouse Clicks on Games or any other Applications. Whether you are using Linux Ubuntu or any other variants of Ubuntu like Linux Kubuntu, Linux Mint or even Linux Fedora or virtually any other Linux, this Linux Auto Clicker can be a really handy tool to automate mouse clicking on your Linux Computer. Yes Just like Automation Tools for Windows, this Linux Auto Clicker offers Global Keyboard Shortcuts and easy to use Graphical User Interface. Have a look at given below screenshot of this Linux Auto Clicker captured on Linux Ubuntu displaying what all type of Mouse Clicks this software can do.

Auto Mouse Clicking on Linux with Linux Automation Tool

Automate Left, Middle and Right Click on Linux with Auto Clicker

This Linux Auto Clicker is offered by MurGuu.com and has a nice looking user interface which you can learn in a couple of minutes. Depending on which Linux Distro you are using, this software will look different on your Linux. The above screenshot was captured on Linux Kubuntu and displays a script or macro being created in which Single Left Click, Left Double Click, Middle Mouse Click and Right Mouse Clicks are added. The Mouse Cursor Co-Ordinates are displayed in the software and this Linux Auto Clicker offers 2 global configurable shortcut keys to get Mouse Location in the edit boxes and another global shortcut key to add the Mouse Click to the script automatically by reading mouse cursor co-ordinates.

Linux Automation would be really easy with the Linux Auto Mouse Clicker presented above. This software has been inspired by Auto Mouse Click Software which is available for Windows Users and partially from Mac Mouse Clicker which is available for Mac OS X 10.5 onward Macintosh versions. Although you will find this Linux Version of the software much more user friendly and easy to use. The very first thing you need to decide is which version to download and try depending on which Linux Version you are using. In case you are running a 32 bit Linux, get the 32 bit version of the Linux Mouse Clicking software or if you are using a 64 bit version of Linux get the 64 bit version of the Linux Mouse Clicking Software from MurGuu.com.

In case you need to automate Mouse Clicking at current Mouse Cursor Location, add a click at X = 999 and Y = -999 and this Linux Auto Clicker will click at the current mouse cursor location and not at X = 999 and Y = -999. You can even Save the Script to any of your Hard Drive Folder and then later load the script. Whether you need to automate multiple mouse clicks at current mouse cursor location or at pre-defined screen locations, this handy Linux Auto Clicker is worth giving a try. You can even suggest a feature to be added to this Linux Automation Tool as the software developers who have written this automation tool are basically Windows users and hence your input can be really helpful to further make this Linux Automation Tool more user friendly and more useful.

Evaluate Windows 8 Performance

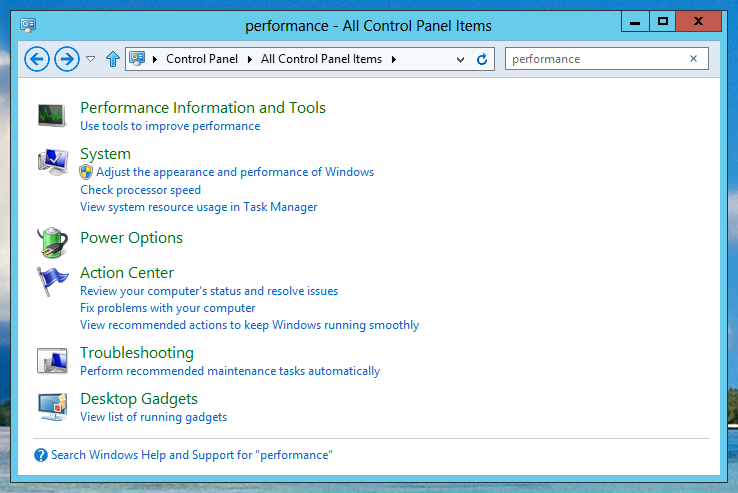
Windows 8 has Performance Information and Tools which allow a non technical person to evaluate and compare two different computers. The Performance of a Desktop or Laptop Computer running Windows 8 is basically determined by the hardware present in the computer. Whether your Computer is a Brand Computer or an Assembled Computer, performance, speed and other ways in which you interact with your Windows 8 Computer depends on parts are present in the computer. On a broad level CPU Speed, Memory Size and Speed, Hard Disk Data transfer Speed and Graphics Capabilities together determine how good your computer running Windows 8 can perform. Microsoft provides a tool to evaluate the performance of your computer. This Performance Information and Tool can be launched from Control Panel as displayed below.

Performance - All Control Panel Items of Windows 8

Search for Performance in Control Panel Items of Windows 8

Just Open up Control Panel and Search for Performance to view the tools available in Windows 8 to evaluate and improve performance. When you run the performance tool, it will take couple of minutes to evaluate your computer running Windows 8 and at the end of the test run, your computer will be assigned a score as displayed below.

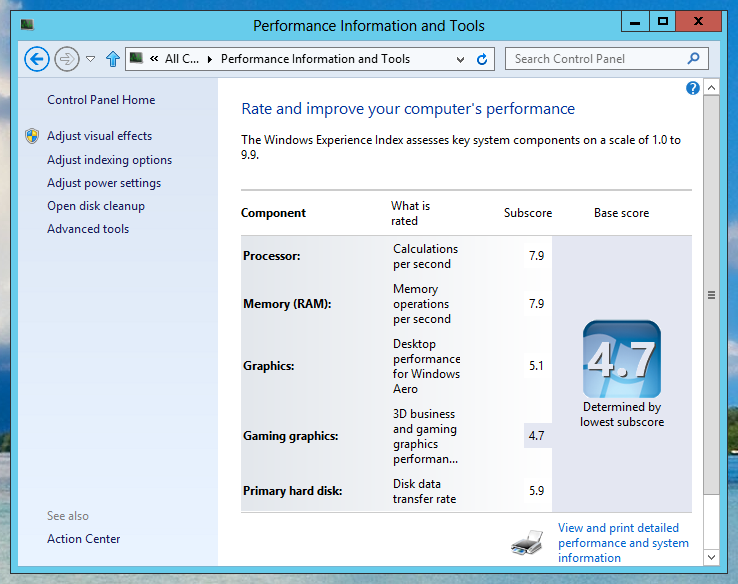
Performance Information and Tools of Windows 8

Score assigned by Performance Information and Tools of Windows 8

Have a close look at the above screenshot and notice that this Windows 8 Desktop Computer has been assigned a base score of 4.7. The Computer on which performance tools were run is a Windows 8 Computer running 64 bit version on a I7-2600 (Max Speed 3.4 MHz) Computer with installed memory of 16 GB. In order to improve the performance of this Windows 8 Computer, the performance tools suggest that New Hard Disk with better Speed and a Graphics Card must be added to the Computer. The Processor has been given good marks and so is the Memory (RAM) and Graphics and RAM have been assigned lower score.

Yes these Performance Tools are also there in Windows 7 and in case you are planning to upgrade to Windows 8, you might consider checking your existing computer’s performance and download a Free Trial of Windows 8. In case you do have a desktop computer, the performance tools might help you to decide what components should be added to further performance of your Windows 7 or Windows 8 Computer. Laptops can also be evaluated using this method and of-course you can upgrade few parts of your Laptop or get a new one.

Multiple Clipboard Software for Windows

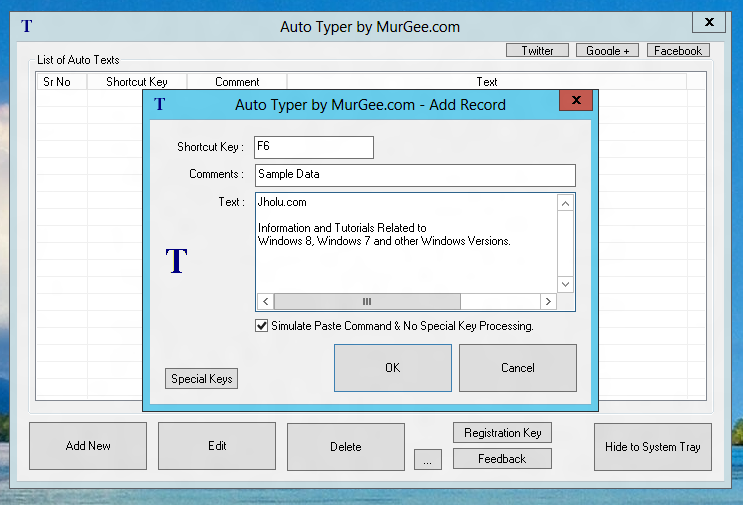
This post presents a multiple clipboard software for Windows. The Software presented here works only for plain text and not for images or other formats which clipboard supports. Plain Text is one of the main purpose for which we all use clipboard. Without Copy – Paste , Windows would have been really difficult to use and ofcourse time wasting. To Clipboard you can copy lots of stuff including plain text (text which is displayed in simple text editors like notepad), Rich Text (Text which is displayed normally in Rich Text Editors like Wordpad, Microsoft Word, etc), Images (Clipboard functionality is supported by lots of software utilities like Windows Explorer, Microsoft Paint, etc), and yes clipboard supports many other objects. Have a look at the given below screenshot which offers multiple clipboard type functionality for simple unicode (text in any language) text.

Store and Retrieve Multiple Text from using Clipboard

Store Multiple Text Sentences and Paste them using Clipbaord

As the above screenshot displayed, you can store single or multiple text sentences in the software along with a system wide keyboard shortcut. You can opt to simulate paste command on the press of your defined keyboard shortcut and your existing clipboard text will be preserved as well. In Clipboard Mode the software presented here, backs up existing clipboard data in memory, copies the stored text to clipboard, simulates Ctrl + V Command, restores the clipboard text back. Effectively you can store multiple short or long text strings and define keyboard shortcut for every text and whenever you want to use any of the text in a text box which supports Ctrl + V command, just press the keyboard shortcut and this software will work as multiple clipboard software and you can speed up your copy / paste or text typing commands. Irrespective of the length of the string stored in the software, the Paste Command is really fast and you your typing speed will not be affected due to the usage of this multiple clipboard software.

Apart from the Clipboard Mode, this software works in another mode in which, the software can simulate keyboard typing. Almost every key on keyboard can be automated and hence, the speed of text typing will be slower as compared to the clipboard mode.

This Multiple Clipboard Software works on Windows 8, Windows 7, Windows Vista and even on Windows XP. You can even store few text sentences using Clipboard Mode and others in Automated Typing Mode with Special Keyboard Keys Processing. This Free to try keyboard automation software can really save you time and efforts and in order to enjoy multiple clipboard functionality for plain text in any language, you must give this keyboard typing software a try.

Desktop Menu Management of Windows 8

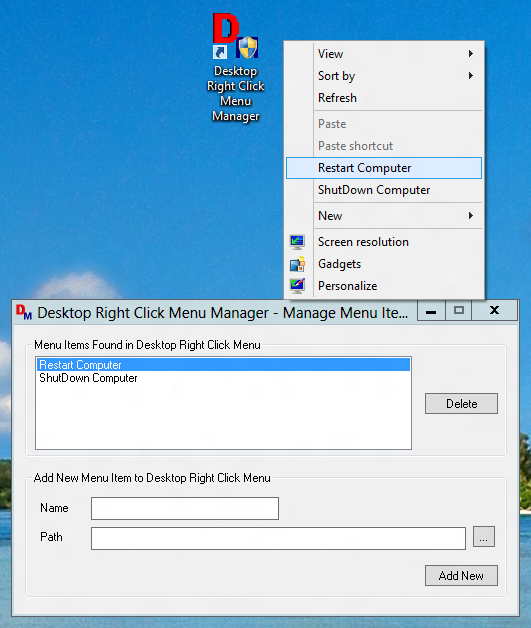
Desktop Menu which is displayed on Right Click on Desktop of Windows 8 is the easiest way to control Windows 8 Settings. Many Applications add New Command to the Right Click Menu of Windows to allow users o easily launch or configure application. The Software presented here is a small application which allows you to easily manage this Right Click Menu of Windows 8. This Tool allows you to add new command and delete existing commands from the Right Click Menu of Desktop. In order to use this tool you would need to understand compatibility mode of Windows 8 as well.

Manage Right Click menu of Windows 8 easily

Add or Remove Command to Right Click menu of Windows 8 Computer

The Above Screenshot displays the Desktop Menu Management Software with 2 extra commands added to the Right Click of Desktop. The Shortcut displayed in the screenshot is the tool which was used to launch the software. This Desktop menu Management Software requires you to run the application with admin rights. As the extra commands added in the Desktop Menu will be visible to all users of the computer, you need to understand this and authorize yourself with optional user name and password with administrative privileges. The Restart Windows and Shutdown Windows 8 Commands were added using another Desktop Shortcut Software on this Windows 8 64 bit computer.

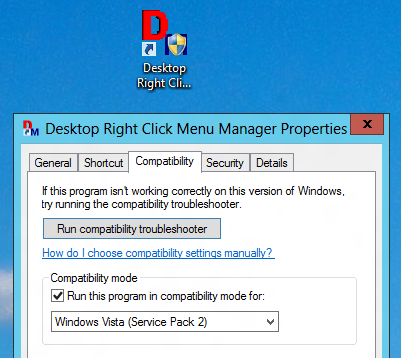
As of this writing the Desktop Menu Manager Software works only on Vista and hence to run this software on your Windows 8 Computer, you would need to run this application with compatibility mode of Windows Vista as displayed in the screenshot below. In order to configure the Menu Manager Software with Windows Vista Compatibility Mode, right click on the Shortcut, select properties and navigate to the Compatibility Tab. From the drop down of available operating systems, select Windows Vista and Close the Properties Screen using the OK button.

Enable Compatibility Mode in Windows 8

Configure Compatibility Mode of Desktop Menu Management Software to Windows Vista on your Windows 8 or Windows 7 Computer

Once you have configured the Windows Vista Compatibility Mode for the Desktop Menu Software on your Windows 8 or Windows 7 Computer, you can easily control what commands are displayed in the Desktop Right Click Menu of your Windows 8 or Windows 7 or Windows Vista Computer. The above screenshots were captured on a Windows 8 64 bit computer the software works fine on 32 bit versions of Windows Vista onward computers as well.

Shutdown Network Computers Windows 8

Remote Shutdown Tool of Windows allows you to shutdown single or multiple computers on network with a graphical user interface and with command line options. You need to have shutdown computer rights of the target computer to initiate the shutdown and you need remote computer(s) name. In case you are new to the Remote Shutdown Tool, give it a try first on your local computer and then using the graphical user interface for network of computers and finally create a batch file for shutting down network computers using your windows 8 or computers on network running windows 8. You do not need to worry about 32 bit or 64 bit architecture of windows 8 on your local or remote windows 8 computer. You also do not need to worry whether network computer might be running a desktop or windows 8 app or even on windows 8 start menu.

Shutdown Network Computers working on Windows 8

Shutdown Network Computers working on Windows 8

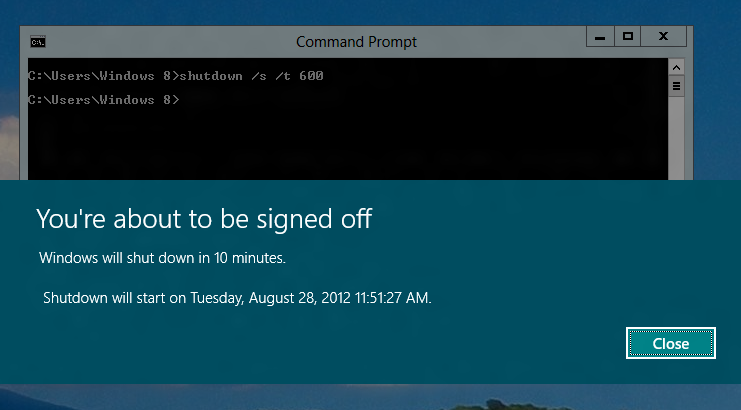
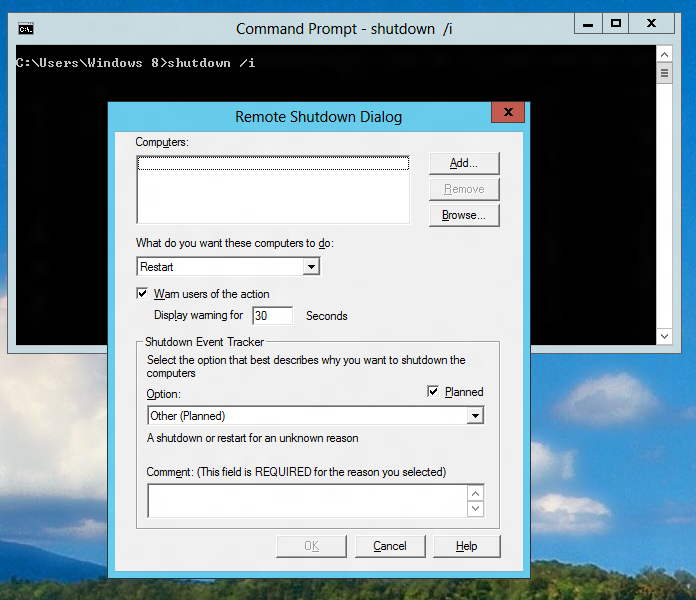
Have a close look at the screenshot above which displays the command line used to initiate Windows 8 shutdown and the message displayed on a Windows 8 Computer. The Windows 8 Shutdown initiated in the above screenshot was from a command line using the command line shutdown /s /t 600 and yes signed on user had windows 8 shutdown privileges.

Remote Shutdown Utility of Windows 8 launched from Command Line

Remote Shutdown Utility of Windows 8 launched from Command Line

Network shutdown of Windows 8 computer can be tested using shutdown /i command which displays a graphical user interface. Given above Remote Shutdown of Windows 8 displays how you can test remote shutdown of windows 8 computers with a graphical user interface. Apart from Computer Names to Shutdown, rest all can be easily selected. In case you have not configured your network computers into a workgroup or domain or not defined access rights, this remote shutdown of windows 8 computers will not be of help and you would get a Access Denied Error. In case you would like to Shutdown Windows 8 Computer with a Desktop Shortcut or according to a configurable script, then the Easy Shutdown Software Utility can be of help. Restart Windows 8 Post of this website can also give you desktop shortcuts to shutdown, restart, logoff, etc ways to control your local windows 8 computer. The Most Difficult part of Remotely Shutting down of windows 8 computers can be managing access rights and rest all is easy and as per new graphical user interface of windows 8.

Windows 8 has inbuilt Adobe Flash Player

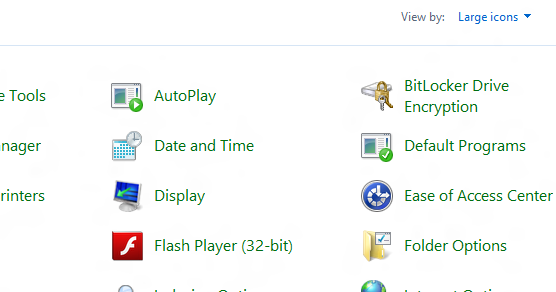
Yes Adobe Flash Player is pre-installed in Windows 8. Microsoft has realized the importance of flash in websites for playing videos and hence Windows 8 comes with Flash Player built in. On a 32 bit Windows 8 and even on a 64 bit version of Windows 8, you will get 32 bit version of Adobe Flash Player installed. In case you would like to view or manage settings of the Adobe Flash Player, you would need to open Control Panel and find out the Adobe Flash Player Icon. When Author installed a 64 bit version of Windows 8 Enterprise Edition, Adobe Flash Player of Version 11.3 was installed.

Pre Installed Adobe Flash Player on Windows 8

32 Bit Adobe Flash Player inbuilt on a 64 bit Windows 8 Computer

The Icon of Adobe Flash Player in Control Panel Settings will allow you to control settings of mic, video playback, Adobe Flash Player Updates, etc. Whenever you are watching a video on a website using Flash Player, you can right click on the video to view current Adobe Flash Player Settings and optionally change them as well.

Launching Control Panel in Windows 8 can be made easy using Control Panel Software Utility. This Application Utility allows you to launch various useful Control Panel Applets using System Tray Icon. Yes this Control Panel Software works on Windows 8 and even on Windows 7, Windows Vista, etc.

God Mode of Windows 8

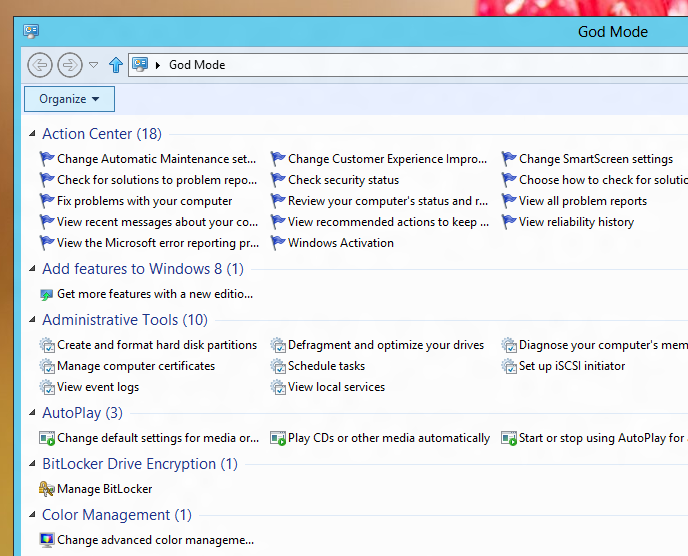
Windows 8 offers to many features to configure and control and remembering each of the settings might not be really easy and hence this post presents God Mode of Windows 8. Using God Mode of Windows 8 you can view all the configurable settings of the control panel. Yes you can search and find any applicable control panel setting as well, but this God Mode can be more helpful as compared to searching control panel settings. This God Mode or you can name it to anything else is just a folder with a special name i.e. GodMode.{ED7BA470-8E54-465E-825C-99712043E01C}. In case this Windows 8 God Mode sounds confusing, have a look at the screenshot of the God Mode Folder below.

Windows 8 God Mode with Special Folder Name

Create a New Folder and Rename it to GodMode and associated GUID

In order to view the God Mode of Windows 8, just create a new folder on desktop or any other folder location. Rename it to something like GodMode.{ED7BA470-8E54-465E-825C-99712043E01C} where the text GodMode can be anything else as well, but the GUID must remain the same. Once you are done renaming the folder, the folder icon will change automatically to the Control Panel Icon and you will be able to rename it again with ease.

The Windows 8 God Mode displays you everything that you can configure using Control Panel Settings. It can be really easy to find out which windows 8 setting can be of help to you in order to configure a particular feature of Windows 8. You can even right click on any of the icons listed and create a desktop shortcut to later easily launch the specific windows 8 control panel command. The Windows 8 Tips and tricks can also be useful to extract the most out of your Windows 8 experience. Powered with God Mode of Windows 8, understanding of how Windows 8 works and few tips and tricks you can do almost everything with your windows 8 pc.

Yes ofcourse, Microsoft does not provides everything and for the remaining functionality, you can contact third party software development companies like MurGee.com. There are lots of software development companies and various search engines are there to help you find the best possible software solution for your requirements.