Schedule Mouse Click(s) with Task Scheduler

In order to schedule Mouse Clicking you would need a Software that can do Mouse Clicks and Windows Task Scheduler. There are basically two steps in scheduling Mouse Click(s) to run at a later date / time at times supported by Windows Task Scheduler such as Daily, Weekly, Monthly, One Time, etc. This Tutorial displays the steps required by presenting appropriate screenshots and related information. Yes you would need appropriate access to schedule tasks and of-course appropriate plan where you want the mouse cursor to click.

Desktop Shortcut of Mouse Automation Script

Desktop Shortcut of Mouse Automation Script

Mouse & Keyboard Automation Software titled  MurGee Auto Mouse Clicker is used in this tutorial. This Automation Software allows you group and save mouse clicks to a file with extension .mcs . Once you have created the .mcs file, you can double click on it to launch it and the stored Mouse Clicks will start executing. While the Mouse Clicking is being done automatically, you will find an extra System Tray Icon (Similar to the Desktop Shortcut Icon displayed above in the screenshot) indicating that the Automated Mouse Clicks are being executed. In order to find more about this Mouse Automation Software, do visit the Auto Mouse Clicker homepage.

Once you have stored your mouse click(s) in a .mcs file, tested it appropriately, now it’s the time to launch Windows Task Scheduler. There are multiple ways to launch Task Scheduler and you can select any way according to your operating system and personal choice. Given below are the ways to launch Task Scheduler on Windows 8 and depending on whether you are using Windows 7, Vista or other Microsoft Windows Operating System, your way to launch Task Scheduler can be little different.

  • Create a Desktop Shortcut pointing to Taskschd.msc . No need to worry about the actual location of Taskschd.msc file.
  • Open Command Prompt, Enter Taskschd.msc and press Enter to Launch Task Scheduler.
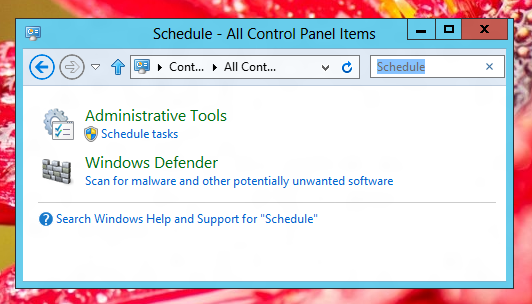
  • Open Control Panel and Search for Schedule and Control Panel will display you the Icon to launch Scheduled Task and create new Tasks in Task Scheduler as displayed in the screenshot below.
  • Open Task Scheduler from Control Panel

    Search for Schedule in Control Panel to Open Task Scheduler

    You can also navigate to Administrative Tools and Look for Schedule Tasks Icon to Open Task Scheduler.

    Once you have Task Scheduler Open, you are almost ready to schedule Mouse Clicks with the .mcs file created in the steps above. Locate and Click on the Text labelled Create a Basic Task as displayed below which opens up a wizard prompting how and when you want the new scheduled task to be executed.
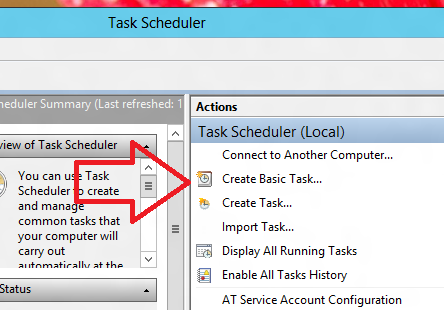
    Create Basic Task in Windows Task Scheduler

    Create Basic Task in Windows Task Scheduler

    The Task Scheduler prompts for a Task Name, Description, Interval and when it asks you to Enter the Program Name to be Started, enter the file path of the Mouse Automation Script. In case you have stored the Automation Script in a Path which has spaces in it, enclose the full file path of the .mcs file with double quotes as displayed below.
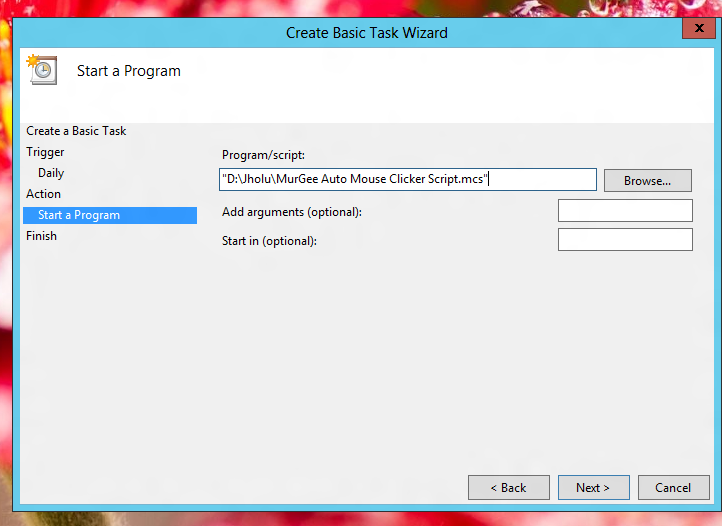
    Start a Program with Windows Task Scheduler

    Start a Program with Windows Task Scheduler

    Complete the Task Scheduler Wizard Steps and at the scheduled time, your Scheduled Mouse Clicks will be executed. As said above when the automation script is running, an icon in system tray indicates that the script is running. One important thing to remember here is that the .mcs file containing does not have mind of it’s own and it will do whatever you have asked it to do. You must test the automation script first without Task Scheduler and then with Task Scheduler to finally deploy the script to action for actual usage.
How to Turn Off Internet on a Windows Computer

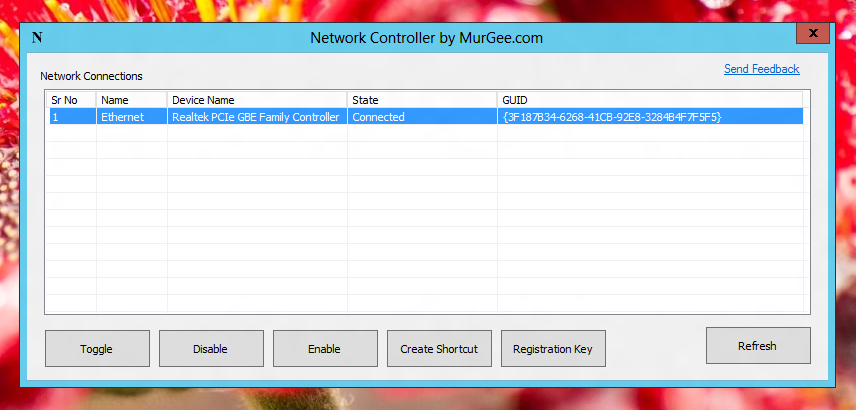
In order to turn off internet connection to a Windows Computer, there are multiple ways. Turning Off of Internet can be Software or Hardware Controlled. The basic principle to understand when turning off internet is that Internet is connected to a Windows Computer using Network Connection. Whether you are using Wired or Wireless Connection to connect to Internet, you can control connectivity of internet using control to Network Connections. You can use a software utility to Turn Off and On Internet connection by disabling Network Adapter from a graphical user interface or with desktop shortcuts as displayed below.

Turn Off or On Internet with Desktop Shortcut or other Controls

Turn Off or On Internet with Desktop Shortcut or other Controls

The Software Application presented above is Network Controller and as name suggests it can control Network Connections. You would need admin rights to enable or disable any listed network connection which connects your Windows Computer to Internet. In order to disable any network connection you can simply click the appropriate buttons or you can simply create desktop shortcut(s) to turn off internet and to turn on internet again by disabling & enabling your active network adapter respectively.

Disabling any Network Connection will also disconnect Computer’s connectivity with other computers using LAN / WAN or other networking ways. You must understand that turning off internet this way is actually doing more stuff and is not only disabling internet. Disabling any Network Adapter also disconnects connection from your computer to the outside world.

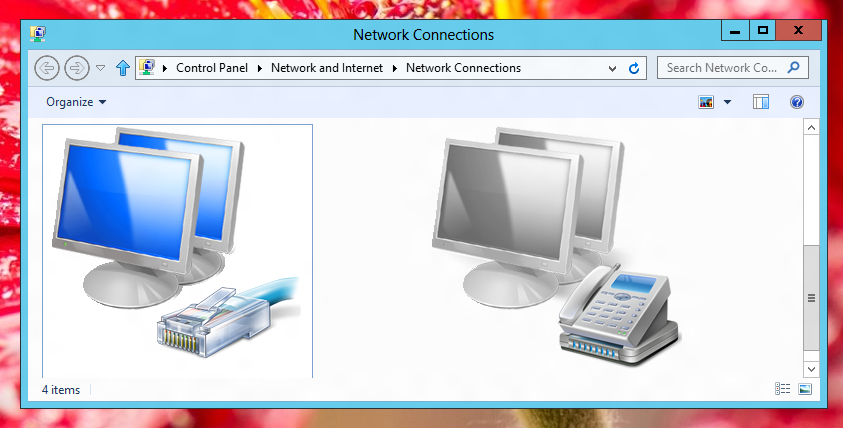
Turn Off Internet using Network Connections of Windows Control Panel

Turn Off Internet using Network Connections of Windows Control Panel

You can alternatively disable internet connection by going to Control Panel and disabling the connected Network Adapter. In case you would like to block specific websites, then you do not need to turn off the internet completely on your windows computer. You can simply use add the sites to block in hosts file and that will be sufficient to block specific websites on your windows computer.

In case your computer connects to the Internet with a Modem and no other Computer is connected using that Modem, the best way to Turn Off Internet Completely on your Windows Computer is to look for Cable / Wireless Connection connecting your Computer to Internet and unplug it. This is a hardware controlled solution and does not requires you to struggle with Admin Rights / UAC Prompts and other understanding of Network Connections in Windows.

While dealing with Network using Software or Cables, it is always best to consult a person who understand networking. Network Connections can be simple when using Single Windows Computer. The Network Cables, Wireless Connections and Software Applications all together work to provide you computer the appropriate Internet Connection. Do make sure that you do understand what you are doing when dealing with network connections. In case you do Turn Off Internet using any of the ways provided in the post, make sure that you understand how to reverse the process and turn on internet again.

Duplicate File Finder for Windows

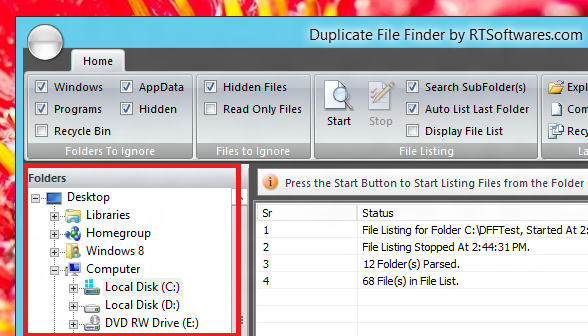
Find Duplicate Files on your Windows 8 Computer easily and quickly with Duplicate File Finder. Whether you need to locate duplicate images, videos , audio files or anything else, this super fast Duplicate File Finder can locate duplicate files really quickly. This Duplicate File Finder allows you to control various configuration parameters and can be helpful when you are trying to locate duplicate files on your whole computer or on only selected folder. This Duplicate File Finder allows you to specify search folder from the left hand side of the software as displayed in the screenshot given below.

Search Duplicate Files in Selected Folder with Duplicate File Finder

Search Duplicate Files in Selected Folder with Duplicate File Finder

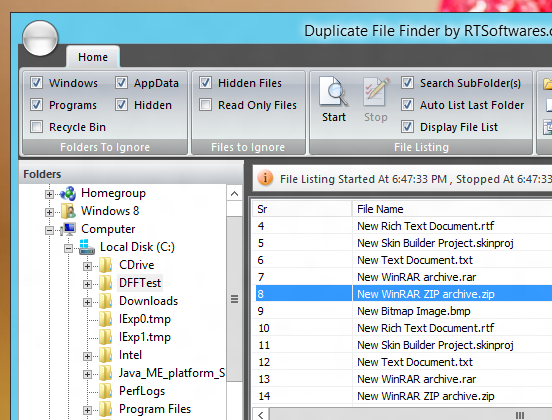
Once you have selected a folder from the left hand side of the screen, you need to click on the button labelled as Start to start listing files in the top right corner of the Duplicate File Finder. While listing the files, you have two option, either you can view all the file names or you can view the summary only as displayed in the screenshot above. The Checkbox titled Display File List controls whether to list summary or to display all the files in the top list as displayed in the screenshot below.

Listing of Files in Duplicate File Finder

Listing of Files in Duplicate File Finder

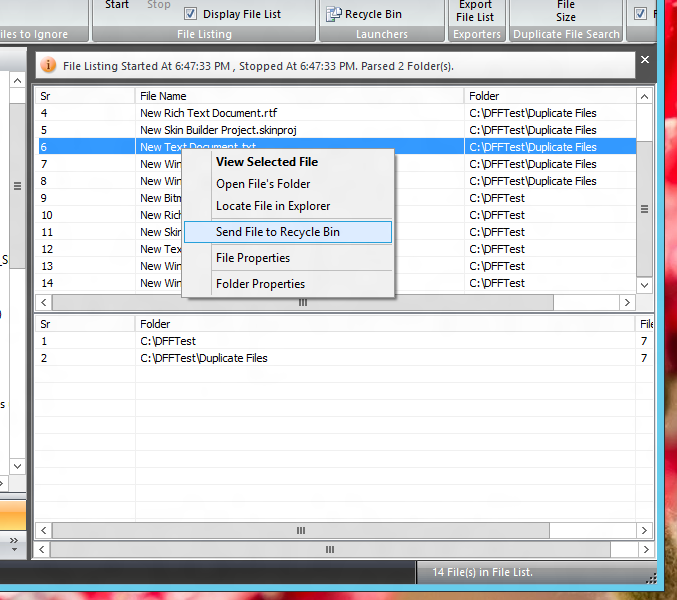
Once you have listed the files in the selected folder and you are happy with it, you can find out duplicate files from the list. Before finding out duplicate files, you can optionally view any selected file using right click menu on the selected file as displayed in the screenshot below. There are lots of file control commands which you can issue using the right click menu. You can even select multiple files to view them in Windows Explorer, send them to recycle bin and much more. You can even view the files count in the each folder from the list of folders at the bottom right corner of the Duplicate File Finder as displayed in the screenshot below.

File Control Commands and Directory List in Duplicate File Finder

File Control Commands and Directory List in Duplicate File Finder

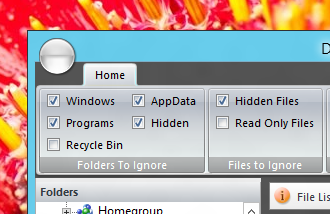
Both listing of files and folders allow you to visually manage files on your computer. Depending on the folder you select to list files, it can take some time or it might be really fast. There are less chances that you would need to view and delete duplicate files in Windows Folder, Program Files, etc. Depending on your Windows Installation and software applications installed on your Windows Computer, you can have thousands of files in Windows Folder, Programs Folder, etc. The Duplicate File Finder allows you to skip listing of files from selected folders. You can even skip by file type such as Read Only File, System File, etc. These configurable options must be set before listing of files in any selected folder as displayed in the screenshot below.

Configurable Options to Skip Files and Folders in Duplicate File Finder

Configurable Options to Skip Files and Folders in Duplicate File Finder

By default optimal configuration setting are configured in the Duplicate File Finder and can really speed up listing of files in System Drive such as C:\. For other folders or even on non System Drives, the configurable options such as ignore Hidden Files and Ignore Read Only Files can be useful. Checking for files in Recycle Bin is a time consuming task and hence listing of files can be really fasten by checking the recycle bin manually and use the default software settings.

Launchers in Duplicate File Finder

Launchers in Duplicate File Finder

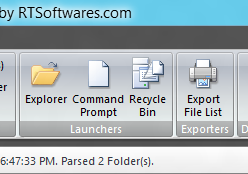
There are launchers in Duplicate File Finder (as displayed in the screenshot above) which work on the selected folder. These Launchers can be useful to manually check files and folders using Windows Explorer or Command Prompt. You can even launch Recycle Bin from the Duplicate File Finder to permanently delete files which you are sure can be deleted without any loss. Files Deleted by Duplicate File Finder are sent to the Recycle Bin so that you can cross check which duplicate files have been deleted and optionally restore any deleted file.

Duplicate File Search Button in Duplicate File Finder

Duplicate File Search Button in Duplicate File Finder

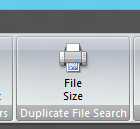
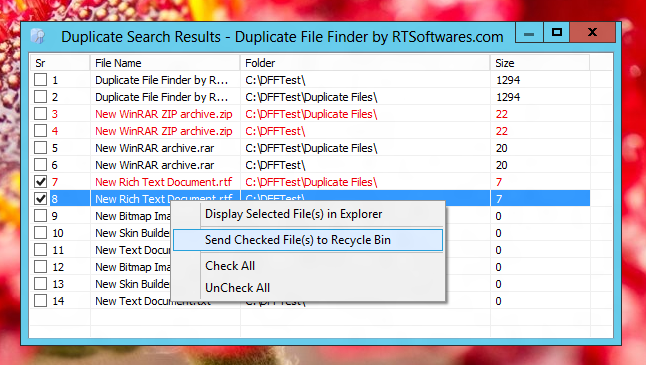
Now to the Final Part which is finding Duplicate Files in the Selected List of Folder. Once you are happy with the file listing and you want to delete duplicate files, all you need to do is click on the File Size Icon available in the Duplicate File Search group. This command will open up a window which will display possibly duplicate files grouped by file size. The Screenshot below displays the Duplicate File Search Window of Duplicate File Finder. All the commands in this Duplicate File Search Window are available on the right click menu of the listed file. The Duplicate File Search Window will not display files for which there are no possible duplicates as indicated by file size.

Duplicate Files Found and available command to manage Duplicate Files with Duplicate File Finder

Duplicate Files Found and available command to manage Duplicate Files with Duplicate File Finder

Possible Duplicate Files grouped by same file size are displayed by the Duplicate File Search Window. Now it is upto you to decide which files are duplicate and which files you want to delete. The File Deletion using this Duplicate File Finder allows you to undo you changes by going to the Recycle Bin and restoring accidentally deleted files. Once you delete files from Recycle Bin, only sophisticated file manager software application which allow you to undelete or restore deleted files can restore your files. The Duplicate File Finder sends the files to recycle bin as commanded by user.

Download free trial of this Duplicate File Finder on your Windows 8 or any other Microsoft Windows Computer to view and manage your files. Find Duplicate files, Delete Duplicate Files by sending them to Recycle Bin, Visually see how many files / folders are there in any selected folder and how many files every folder contains. The Duplicate File Finder is a 32 bit application but works fine on 64 bit variants of Microsoft Windows Operating Systems. You can download and try out this software utility on your Windows Vista, Windows 7 and of-course on Windows 8 Computers. All the screenshots captured in this post were captured on a Windows 8 64 bit Desktop Computer.

Take Screenshot of Only one Monitor

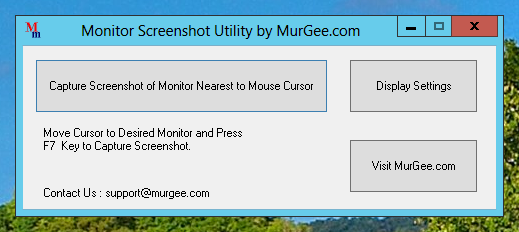
Now you can take screenshot of one monitor easily and quickly. Taking into considering Monitor Resolutions getting bigger and bigger, the screenshot size of a single monitor can become very large. Whenever you need to send screenshot of complete monitor to someone, now you do not need to take the screenshot of all the monitors and utilize your graphics editing skills to show only one monitor. Yes you can simply take screenshot of any given monitor and save time and efforts. In order to take screenshot of only one monitor, all you need to do is point to the target monitor in your multi or dual monitor windows computer and press the keyboard shortcut displayed in the software’s main screen as displayed below.

Take Single Monitor Screenshot in your Multiple Monitor Windows Computer

Take Single Monitor Screenshot in your Multiple Monitor Windows Computer

Download this Screenshot Utility to take screenshot of any monitor easily and quickly. The Windows Utility presented above is Free for MurGeeMon users. There are no configurations to be done and the utility just works fine on Windows Computers including latest Microsoft Operating System named as Windows 8. This Screenshot Utility captures the screenshot of the Monitor on which Mouse Cursor is currently present and saves the captured screenshot in a .bmp file. Bitmap Files can be very large in size, but they give best image quality. In case you want to send the captured screenshot to someone using email or even upload it onto some website, you can use Image Converter to convert the image file to .png, .jpg and other file format.

This Screenshot Utility stores the screenshot in a Temp Folder and opens up the folder whenever the screenshot is taken. Yes you can even use this Screenshot Utility on a Single Monitor Windows Computer, however it can be really useful for Dual and Multiple Monitor Windows Computer Users. This Screenshot Utility can be used to take single monitor screenshot irrespective of where your Monitor is located in the large Virtual Monitor Space. The screenshot captured automatically matches your Display Resolution of the Monitor whose Screenshot is taken. You can even launch Display Settings using a Button on the main screen of the Monitor Screenshot Utility.

Macro Software for Mac

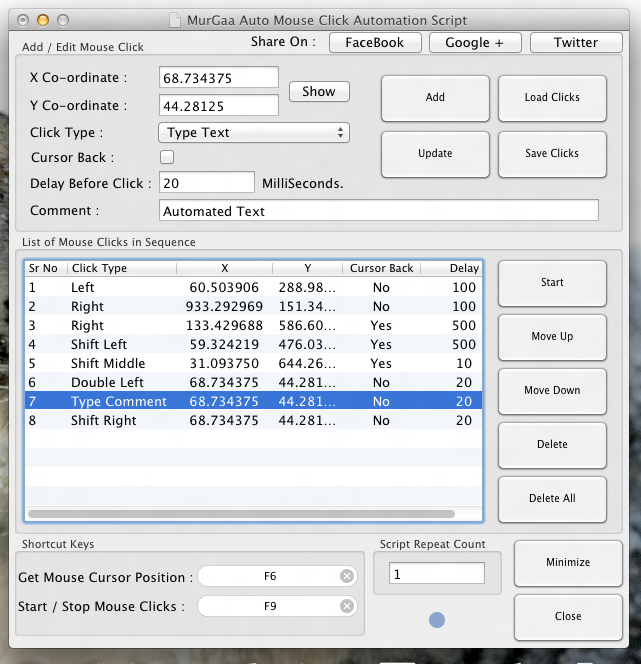
Easy to learn and use Macintosh Macro Software is presented here. In order to create and run macros with this Mac Keyboard & Mouse Automation Software, you do not need to learn any script or even command line options. A single look at the given below screenshot of the Macro Software for Mac will give you an idea of what all you can automate with this Macro Software on your Macintosh running on Mac version 10.5 , 10.6, 10.7 & even on Mac 10.8. This Macro Software can start doing Macintosh Automation for you within a couple of minutes instead of spending lots of time in understanding some complex scripting language. Once the Macro Software is installed, it even displays few video tutorials running on Macintosh Lion.

Macintosh Macro Software for Keyboard and Mouse Automation

Create and run Macro for Automation on Mac Easily and Quickly

The Mac Macro Software screenshot tells almost everything about the software. As displayed in the above screenshots, a Macro has been created to automate Mouse Clicking and Typing text on Keyboard. Mouse Clicks on Macintosh are performed by specifying X and Y screen location co-ordinates. Depending on how many monitors are connected to your Mac and depending on Monitor Configuration, the X and Y screen co-ordinates vary and every pixel has got different co-ordinates. In order to get the screen location co-ordinates on your single or multiple monitor Macintosh, define a keyboard shortcut, move mouse cursor to any screen location and press the keyboard shortcut to let this Macintosh Software determine X and Y Co-Ordinates. You can alternatively enter the screen co-ordinates manually and click on the button titled Show to move the mouse cursor to the screen co-ordinates entered manually.

Keyboard is another important device with which we interact with Macintosh. Yes this Macro Software for Macintosh can automate typing of pre-defined text to the active application automatically. The Comment field is utilized to specify automated text in the Macro as displayed in the above screenshot. The X and Y Co-Ordinate fields will be ignored when running text typing script record of the Macro.

This Macro software can provide you accuracy and speed for your repetitive tasks on your Mac. Recording Macro is as simple as using the assigned keyboard shortcut to get mouse cursor location and pressing the Add button, similarly for Auto Text just specify the text to be automated in the comment field and add the script record to the macro. You can save the Macro to your Desktop or any other location using the Finder Window displayed on the press of the Save Clicks button. Whenever you want to play the recorded Macro, you can either press the Start button or playback the macro with keyboard shortcut.


Windows 8 Desktop

Desktop of Windows 8 is just like other Desktops of Microsoft Operating Systems with new style Start Menu of Windows 8. When Windows 8 starts it displays a Lock Screen which can be removed by either pressing a key on keyboard or by dragging the Windows 8 Lock screen out. What comes after the Windows 8 Lock screen depends on how many users have been configured on the Windows 8 computer. In case only a single user has been configured on the Windows 8 computer and that user has not been assigned any password, the Start Menu of Windows 8 will be displayed. However if there are multiple users configured on the Windows 8 computer or the user has been assigned a password or the user configured is configured to be authenticated using Microsoft LIVE account, a screen will appear after removing the Windows 8 Lock screen to authenticate yourself.

Yes Windows 8 Desktop is not a quick thing to reach to. You need to remove the Windows 8 Lock Screen, Authenticate yourself, reach to the Windows 8 Start Menu and then either reach the Windows 8 Desktop by clicking on the Desktop Icon in the Windows 8 Start Menu or you can press the Windows button on the Keyboard. Once you reach the Windows 8 Desktop, you will find it little bit different than other operating systems as there is no icon of Windows 8 Start Menu on the bottom left corner of the primary monitor.

In order to reach to the Windows 8 Start Menu from Windows 8 Desktop, you need to press the Windows Key on Keyboard. There are Windows 8 Start menu Alternatives or you can adapt to the new Windows 8 Start Menu. Whether you are using Windows 7 or Windows 8, you will find the Taskbar to be really useful. As with Windows 7 Taskbar, you can pin shortcuts to the Windows 8 Taskbar and launch application programs easily. As you install new software applications on your Windows 8 Computer, your Desktop will get more desktop icons and your Windows 8 Start menu will get more icons as well.

Operating System without Hard Disk

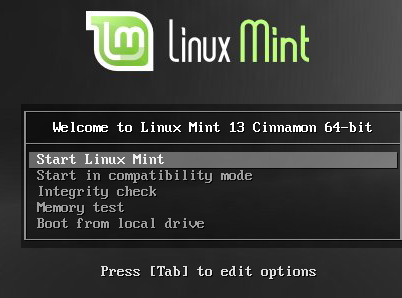
Yes you can an Operating System without Hard Disk easily and quickly. Depending on your requirements, you can choose any of the options available for you to browse internet and enjoy various features of the operating system without having an active hard disk connected to your computer. The very first option is download and run a Linux or Ubuntu based operating system. Ubuntu based operating systems ship an iso file which can be written onto a USB drive or to a CD. Once you have downloaded and burnt the iso file to a CD or DVD, all you need to do is boot from that Disc or CD. Linux Mint displays a screen as given below and it just boots the computer without any intervention just fine.

Run 64 or 32 bit Mint  (A Linux Operating System) without Hard Disk

Run 64 or 32 bit Mint (A Linux Operating System) without Hard Disk

You can even run other Linux Operating Systems such as Ubuntu, Fedora and lots of other Linux Distros the same way. Just download 32 bit or 64 bit version, burn it to CD or to a USB and boot the computer from it. You can even download and install software applications on your new operating system running without hard disk. In case you do play games or do repetitive tasks, you can download Linux Automation Tool and run it from this operating system using RAM as hard disk. Linux Mint is as good as Windows, comes with Firefox as installed browser, full full fledged Desktop and other GUI stuff.

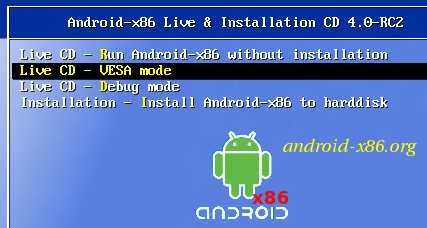
Android on Computer without Hard Disk

Android on Computer without Hard Disk

You can even run Google’s Operating System named Android the same way. Just download iso file of Android, write it to USB or to a CD and boot the computer from it as displayed in the screenshot above. When downloading the Android iso file, you do not need to worry about 32 bit or 64 bit selection as Android currently runs only on 32 bit architecture and you can use the inbuilt browser and enjoy most of  the features supported. When author ran Android without Hard Disk on a Desktop Computer, there was no wired internet connection available and sound was not working either. Yes depending on the technical specifications of your computer, what all Android runs on your Computer without Hard Disk can vary. However Linux on the other hand ran without any issues, internet worked fine and so did the voice on speakers.

Another way to run an Operating System without Hard Disk is to get a Mini Computer and run either Android or Linux on that Mini Computer. In case you want to run Android Operating System without Hard Disk on your Television, all you would need is an HDMI port available on your Television Set and buy and Android TV Box. When buying a TV Box for running Android on your TV, do look for the Android Version installed on the TV Box and try to get a device with latest Android Version.

For running Linux or Windows without Hard Disk and a Desktop or Laptop Computer, you would need to buy a Mini Box. There are Mini Computers available running Intel Atom, AMD and other processor architectures. Raspberry Pi is one such mini computer with which you can easily run Linux without Hard Disk.

Windows 8 32 Bit or 64 Bit

Planning to get Windows 8 and looking for whether you should get a 32 bit or 64 bit version ? Read on and find out which version of Windows 8 would be best for your old or new computer. 32 bit version of Windows 8 can handle memory (RAM) of maximum 3.5 GB and apart from that there are many other differences as compared to 64 bit version of Windows 8. In case you are buying or planning to buy a new Laptop or Desktop Computer, look for technical specifications of the new computer. In case the amount of Memory (RAM) specified is $GB or more than 4 GB, you must get a 64 bit version of Windows 8. However on the other hand if your new computer has got less than 4 GB of memory and you do not intend to add more memory to your computer, you can go ahead with 32 bit version of Windows 8.

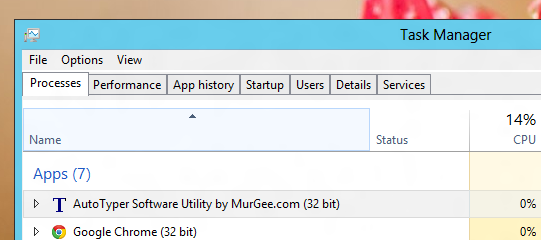
A 32 bit Software displayed in Windows 8 64 bit Task Manager

32 bit Application on 64 bit Windows 8 Computer

On a 64 bit version of Windows 8, any software you install gets installed in either 32 bit mode or in 64 bit mode. In case a 32 bit software is installed on your 64 bit version of Windows 8 and it creates files in Program Files folder, you will find that the setup of the software copies the files in C:\Program Files (x86) instead of  installing the software in C:\Program Files. Another quick way to find out whether a software is 32 bit or 64 bit is using Windows 8 Task Manager which displays whether an application is 32 bit or 64 bit as displayed in the screenshot above.  There are many applications which are supposed to be used on 64 bit version of Windows only.

When you buy a Laptop with more than 4 GB of RAM, the manufacturer will automatically provide you 64 bit version of Windows . Running a 32 bit version of Windows 8 on a Computer with more than 4 GB of memory is wastage of the available resources. Now a days many laptops are sold with DOS as the operating system installed and user is supposed to buy Windows 8 or other operating system on his / her own. In such a case, decision of whether to go with 32 bit or 64 bit version of Windows 8 will be definitely useful.

Other operating systems also has 32 bit and 64 bit variants. Linux and it’s various distros are shipped with separate 32 bit and 64 bit downloads. Macintosh now a days ships with only 64 bit version of Mac OS X Operating System. Yes there are 32 bit and 64 bit processors as well and if you are buying a brand new computer with Windows 8, it is almost certain that your computer’s processor will be 64 bit processor although you may buy a 32 variant of Windows 8.

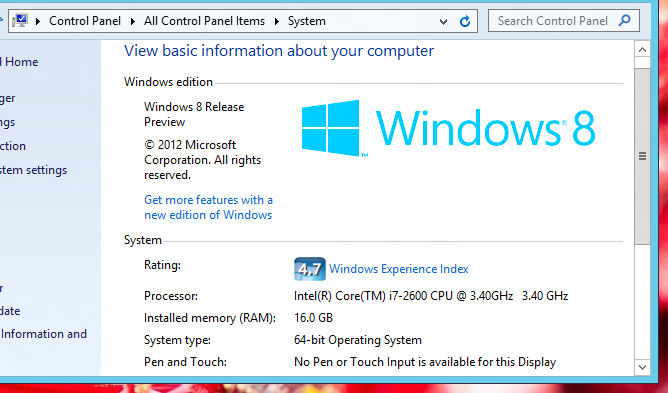
Screenshot displays a 64 bit version of Windows 8

64 bit Windows 8 identification from Control Panel

In order to find out whether a Windows Computer is running a 32 bit or 64 bit version, you can open Control Panel and look into the Systems. The System Settings of Control Panel is displayed in the above screenshot running a 64 bit version of Windows 8. You can also note that the system displayed above is having 16 GB of RAM and is running on a Intel I 7 Processor.

Best Free Video Converter on Windows 8

The very best video converter which works on Windows 8 is presented in this post. The Video Converter presented here works without any issues on Windows 8 and is totally free to download. This Free Video Converter asks for donation the very first time in a non intrusive way which you can be really glad to pay as the author of the free video converter software has put in really lots of efforts. Yes this free video converter is one of the best software which author of this post has seen so far. All the screenshots presented here are taken on a Windows 8 32 bit computer and the feature list of this free video converter is so vast that you would need to look really closely into the software screenshots to get an idea of what all this free video converter can do for you.

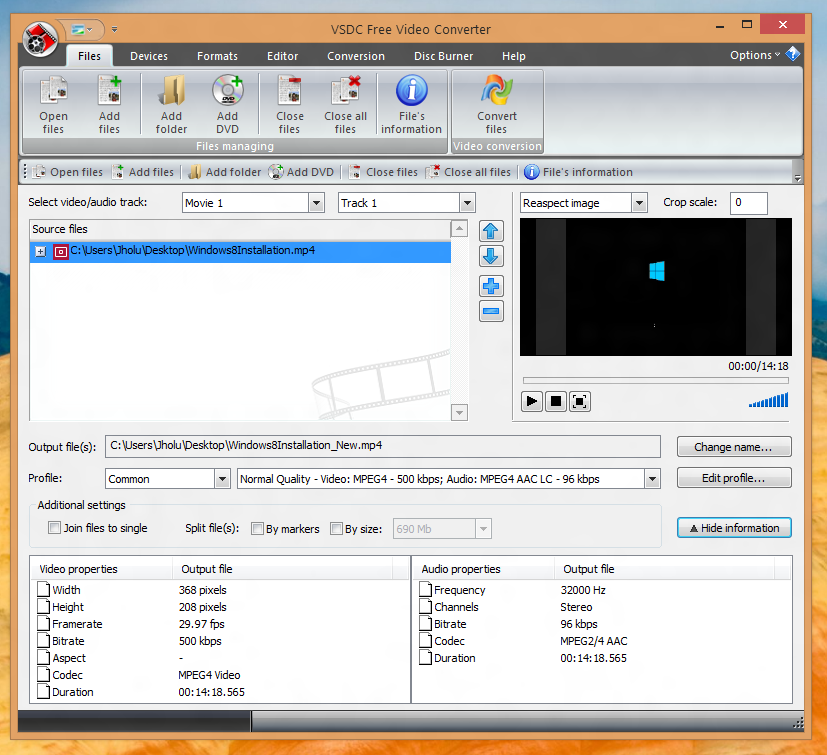
Screenshot of the best free video converter running on a Windows 8 Computer

Best and Free Video Converter on a Windows 8 Computer

Have a close look at the above screenshot which displays the first screen of the free video converter. Notice that a .mp4 file taken from Windows 8 Enterprise Edition Video Tutorial has been added to be converted. Note that before doing any conversion, you can have a look at the technical specifications of the video. Video information such as Width & Height in pixels, Frame rate, Bitrate, Codec name, Duration are displayed. Audio information of the .mp4 file added is also displayed and you can see it on the bottom right corner of the video converter.

Video Conversion Format supported by Free Video Converter

Convert Video to .avi, to dvd format, to mobile video (.3gp), to wmv, etc with free video converter software

From the second tab as displayed above, you can select the new file format. There is a vast selection you can make for the new converted file format as displayed above. All you need to do is select the device on which you want to play the new video and file extension / new video file format will be selected automatically. In the screenshot above, the conversion has been set to convert a .mp4 file to a .avi file to be played on a computer.

Author feels that a complete book can be written about this free and best video converter. You can download this free software right now and give it a try on your windows 8, windows 7 or any other supported windows computer to convert video files into any other file formats. As the above screenshot displays input video file(s) can be converted to be played on a PC, for DVD, for iPod, for Mobile, for PSP, for Xbox, for BlackBerry, for Zune, for Archos, for iRiver, for PPC, for mp3 / mp4 and for PMP. DVD burning can be done within this best and free video converter. A small Video Editor is also present in this Free Video Converter which allows you to edit any video and even export audio separately.


Download Free EMail Client on Windows 7 or on Windows 8

Checking Email on Websites is easy and gives you flexibility, however checking email with a free EMail Software can give you total flexibility and full control over your emails. Whether you are using Windows 7 or Windows 8, you can download free email software from Microsoft and check your single or multiple email account. Yes you can check your pop based email server accounts for emails, manage email rules and everything else with free Mail Management Software from Microsoft. Just download Windows LIVE Essentials from Microsoft website on your 32 bit or 64 bit versions of Windows 7 or Windows 8.

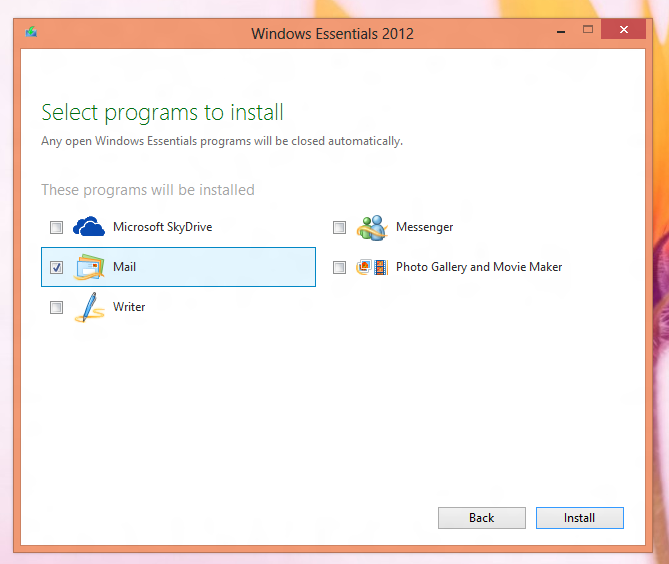
Download Free EMail Software from Microsoft on your Windows 8 or Windows 7 Computer

Download Free EMail Software from Microsoft on your Windows 8 or Windows 7 Computer

This Free Download from Microsoft labelled as Windows Essentials 2012 comes with a selection software of around 1.1 MB in which you can select which utilities you want to download. As displayed in the above screenshot, only Mail Client is selected, however other utilities are free to download as well on any Windows 8 or Windows 7 computer.

This Free EMail Software is almost as good as Microsoft Outlook and you do not need to pay anything. With this free email client software you can check multiple email accounts, subscribe to newsgroups, search emails and much more. Managing multiple email accounts with a single free email software from Microsoft is best done with Windows Essentials. In case you are currently using multiple email account, do download this free email software from Microsoft and manage your EMails easily.