Free Antivirus Software for Windows 8

Windows 8 is now even more secure and comes with inbuilt malware protection. An Antivirus software is traditional software that is supposed to protect the Microsoft Windows Operating System and this post talks about a Free Antivirus for Windows 8 which you can download right now. Yes this free antivirus is provided by Avast and is one of the most popular software to protect against malware and virus infections and more. Whether you have downloaded a free trial version of Windows 8 or any full version of Windows 8 like Professional, Enterprise Edition in 32 bit or 64 bit mode, the free antivirus software by avast is ready for you to download and install and make your computer running Windows 8 really secure.

Antivirus scans every application file to check for virus infections and hence offers protection from viruses. Yes Virus creators are going to get a really hard time in developing malware and virus infections for Windows 8 and as a Windows 8 user, you can enjoy your computer and be relaxed about protecting your operating system. Microsoft is also providing SmartScreen filter for applications as for Internet Explorer latest version. Yes this smartscreen filter in Windows 8 can give false alerts as well and there will be some way to disable it as well. Antivirus software applications do the same thing of protecting the computer but smartly. Avast runs suspicious applications in sandbox to protect your operating system.

In case you would like to save your computer of extra memory and cpu cycles and are worried only about software downloads or other malware applications due to internet browsing, you can use Hosts File blocking method. Blocking websites with hosts file works without downloading any setup applications or running process in background. Yes this method works on all browsers and even on applications, however depending on your usage of your Windows 8 operating system this method of blocking unwanted parasites can be sufficient or you may have to get a full antivirus. Avast is really good, it gives you free trial without any registration and the free version works equally good with Windows 8.
Lock Windows 8 after Inactivity

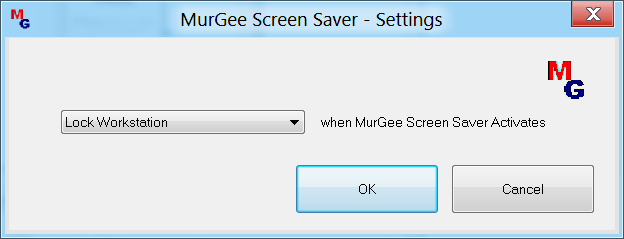
ScreenSavers can be configured on Windows 8 to be launched automatically after inactivity. The term inactivity is used here to denote the duration for which computer is left idle and is not used actively by either human or by keyboard or mouse automation software. In order to Lock your Windows 8 computer after inactivity, you can use MurGee ScreenSaver. Just like any other ScreenSaver you can configure this one using control panel settings. This Windows Control ScreenSaver does not displays any sort of graphics and it just performs the action configured from the ScreenSaver Settings.

Lock Windows 8 Computer Automatically when Left Idle

Lock Windows 8 Computer Automatically when Left Idle

ScreenSavers are actually exe files which are renamed with a .scr extension and are normally found in Windows or System folder. The Screenshot above has been taken on a Windows 8 computer and the software has been tested on Windows 8 as well. Irrespective of the whether you are using a 32 bit or 64 bit version of Windows 8, this ScreenSaver can be used to automatically lock your windows 8 computer when you leave it alone and idle. ScreenSavers have been in Windows for quite a long time and many software applications such as Windows Media Player or other software applications automatically disable and enable screensavers so that while using specific software applications like watching a movie, the ScreenSaver does not pops up and disturb your Movie.

The MurGee ScreenSaver offers lots of other computer control commands apart from locking an idle workstation or computer. Controlling the idle time after which your Windows 8 computer is as easy as configuring the time duration after which the ScreenSaver is launched. There are two types of ScreenSavers that can be configured for a Windows 8 computer. The first type of ScreenSaver is the one which gets invoked when some user has signed onto the computer and leaves the Windows 8 computer idle. This type of ScreenSaver can be controlled using ScreenSaver Settings. In order to open up the ScreenSaver Settings, find an empty space on your Desktop, Right Click and select Personalize, just as you would do on a Windows 7 or Windows Vista Computer. This will open up Personalization Window which will allow you to launch the ScreenSaver Settings from a button at the bottom corner of the Personalization Screen. Other type of ScreenSaver is Login ScreenSaver which gets invoked when a Windows 8 computer is left idle at the Login Screen.

Locking a Windows 8 Computer can save unauthorised access to the computer. Once the MurGee Screensaver has locked your Windows 8 computer, the Lock Screen would be displayed by Windows 8 and you will be required to drag the screen out. Once you are past the Lock Screen, you would be prompted to enter your password or pin as configured. In case your Windows 8 computer has multiple user accounts configured, you will be prompted with your signed on user name and the last logon option would be displayed. As Windows 8 allows to switch between multiple user accounts, you will also have an option to sign on with other user account configured on your Windows 8 machine, however in order to access your own account, you would need to authenticate your credentials as configured. This way to Lock your Windows 8 computer does not requires any CPU cycles and memory while you are actively using your Windows 8 computer. Once Windows 8 detects that the computer has been left idle or inactive, it will check whether ScreenSaver has been enabled or not and in case the ScreenSaver is enabled, Windows 8 will launch the configured ScreenSaver. The MurGee ScreenSaver once launched by Windows 8 checks what it is supposed to do and when it finds that it is supposed to Lock the Windows 8 computer, it will Lock the Windows 8 computer and will exit from the Memory.

Show Desktop from Taskbar

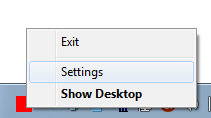
Icon in Taskbar to Show Desktop and in optionally in System Tray or with configurable Keyboard Shortcut can be really useful. Windows 8 and Windows 7 allow to pin any shortcut to taskbar. The Software utility presented creates a desktop shortcut (provided Create Desktop Shortcut option is selected during software installation) and a shortcut in the programs menu to show the desktop. The software is really simple and easy to use and exits from computer memory after showing the desktop. The Show Desktop Shortcut when pressed will minimize any running applications to the TaskBar and another launch of the Show Desktop restores the applications minimized using the show desktop shortcut.

System Tray Menu of Show Desktop Software Utility

System Tray Menu of Show Desktop Software Utility

Watch a Video Tutorial in your Video Player to see how it is easy and quick to launch the software and play with the settings provided by the Show Desktop Software utility. The Video has been shot on Windows 8, all the features of the software presented will work fine on Windows 7 as well. Windows XP does not allows pinning shortcuts to the taskbar. On all Windows versions you can have the Show Desktop command added to the System Tray. A Red colored icon in System tray provides single click access to show the desktop, open up the settings of the software the menu option to exit the software.

Download the Show Desktop Software and give it a try on your own Windows Computer. In case you do have a Windows 8 or Windows 7 computer, you can enjoy all the features of the software. You can Pin the Shortcut to the Taskbar, Move the Icon in Taskbar by dragging it in the taskbar Enable the Shortcut Icon in System Tray, invoke the right click menu of the system tray icons, assign a keyboard shortcut to the desktop shortcut, move the icon in system tray in the System Tray

Uninstall or UnPin Software from Windows 8 Metro User Interface

Windows 8 is really a new operating system from Microsoft offering a new user interface named as Metro User Interface. This new Metro User Interface of Windows 8 provides lots of shortcuts by default to launch various software applications. This post provides information on how to move the shortcuts on Metro User interface of Windows 8 or even UnPin any application or even Uninstall an application created specifically for Windows 8 Metro User Interface. This post provides information on how to UnInstall a Metro User Interface Application or UnPin a Shortcut from Metro User Interface. Desktop Applications can be uninstalled from Windows 8 using the traditional method of navigating to Control Panel , finding the appropriate software from Add / Remove Programs feature of the Control Panel and then following the steps.

Watch a Video Tutorial about how to UnInstall a Metro Software from Windows 8 or read along. The video also displays how you can resize shortcuts on the Metro User Interface of Windows 8, UnInstall any application that is built for Metro Interface only and UnPin a Desktop Application Icon from the Metro User Interface. Apart from removing metro applications from a Windows 8 computer, the video tutorial also displays how you can rearrange the shortcuts on the new interface of Windows 8, there are options to set the size of button on the new user interface in Windows 8 as well, yes there is lots more in this small video tutorial which can be played in your own video player.

In order to remove or uninstall a Metro User Interface Application from a Windows 8 computer, all you need to do is right click on the appropriate shortcut and then options available for that particular button on the metro interface will appear at the bottom of the screen. These options will contain an option to uninstall the selected application, in case the software is programmed to be run only on the Metro User Interface. Normal or Traditional Shortcuts are also displayed in the Metro Interface of Windows 8. In case you right click on such a shortcut, you would have the option to unpin the shortcut from metro user interface, however in case you would like to uninstall a desktop based application with an icon in the Metro User interface, you would have to uninstall it from the Add/Remove Programs option of the Windows 8.

In order to rearrange the shortcuts on the Metro Interface, just select a shortcut and drag it to the new positions. All the other shortcuts on the Metro Interface will arrange themselves automatically. There are two sizes for shortcuts on the Metro Interface and you can switch between them (provided the application has been programmed to support small and big icon size of the particular application) using the right click mouse button on the selected shortcut on the Metro User Interface. Current version of Windows 8 is available for download from Microsoft website totally for free. Yes there will be another version of Windows 8 coming up and yes that new version of Windows 8 will be free to download and try out from Microsoft. The Full Version of Windows 8 will not be free and as yes you would be required to pay for it, however Microsoft will probably offer 90 day trial for that as well.

Desktop Shortcut for Windows Computer Control

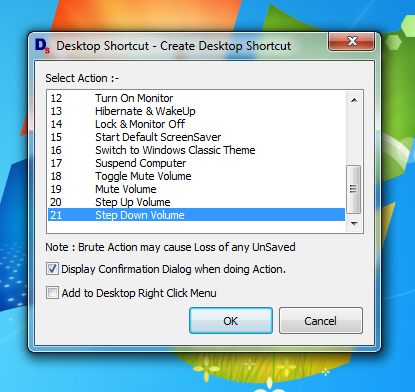
Use Desktop Shortcut Software Utility to create shortcuts on desktop to control your windows computer. Easy to use and configurable Desktop  Shortcut Software Utility is really simple utility to create and use shortcuts on Desktop. There are many Windows Control features for which you can create desktop shortcut with this easy to use utility. Have a look at the given below screenshot which displays few of the windows control functions for which desktop shortcuts can be created.

Create Desktop Shortcuts to control your Windows Computer

Create Desktop Shortcuts to control your Windows Computer

Watch a Video Tutorial about this really tiny and useful software utility to create Windows Control Desktop Shortcuts. The Video tutorial displays all the functions in this desktop shortcut software. Yes there will be more shortcuts added to this Desktop Shortcut Utility and yes you can suggest another appropriate function to be added in this software utility.

Download and try out this Desktop Shortcut utility on your own Windows Computer. Whether you are using Windows 8, Windows 7, XP or Vista, you can create single or multiple useful desktop shortcuts. In case you accidently delete any of the shortcuts created on the desktop, just use the software again to create another shortcut on desktop to control your windows computer.

When creating Desktop Shortcuts with this utility, you can specify whether to display a confirmation screen of not. Depending on your choice of the confirmation screen when initiating the action to be performed by the software, the desktop shortcut will be named appropriately. The Confirmation Screen has by default a audible alert when initiating the action initiated by the desktop shortcut. The audible alert will be as per the action to be performed by the Desktop Shortcut.

Duplicate Window on a Windows Computer

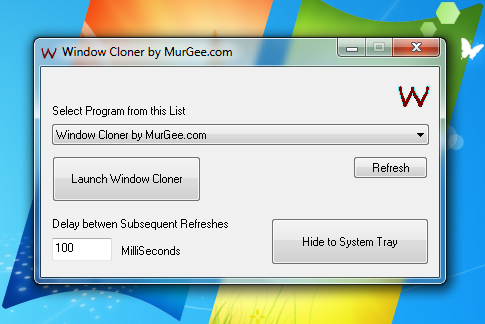
Duplicate any Window on your Windows 8, Windows 7, Vista and Windows XP computer using this Window Duplicator Software Utility. The Software presented is a small sophisticated and configurable software utility which can be used to duplicate any application or document window onto another resizeable window. This post presents Video tutorial of the software and presents screenshot of the software. Duplicating a Window can be really useful in many ways. The following paragraph outlines few example usages of the software application and presents screenshot of the software as well.

Duplicate any Application or Document Window on your Windows Computer

Create a Replica of any Selected Window with Window Duplicator

Let’s say you are giving a presentation using a Projector connected to your Windows computer and you want your audience to see only one application and you do not want them to see your desktop or other applications, then this Window Duplicator software can come in really handy. In order to use this software and display only clone of a selected window on projector, you would need to connect the projector in extended mode and then you can create duplicate windows and drag them to the projector. As this software is useful when using extended mode, it also provides you the functionality of having different display resolutions for computer and projector. In case you simply use clone mode on a windows computer to display your desktop onto the projector, your whole desktop will be visible onto the projector and the display resolution of your computer monitor will be the same as that of the projector. In case your projector supports lower resolution than your monitor, the clone mode would force both computer and projector to display desktop and other applications in the minimum resolution supported.

Connect a Projector to a Windows Computer or connecting another Monitor to the Windows computer is the same to the Windows. In case you do have a dual or multiple monitor windows computer, you can use the software presented in this post to create single or multiple duplicate windows and drag them to any monitor you want them to be. The Duplicate Windows have a configurable refresh rate and they are also resizeable windows. The Duplicate Windows do not transfer the Keyboard or Mouse Input to the actual application, however you can drag the duplicate windows by holding them with title bar or any other place in the duplicate window as well. Closing the application which is being duplicated will automatically close the duplicate window(s) created using the software utility.

Watch a Video Tutorial or download the MurGeeMon software application to give it a try yourself. Yes this Window duplication software works on Windows 8, Windows 7 and other versions of Windows. The Software is offered on a shareware or try before buy basis. In case you would like to suggest a new functionality, please do write to the support team. This Window Duplicator automatically resizes the Duplicate Windows to the size of the actual window on startup. Once a Duplicate Window has been created, you can resize it by dragging it from the corners as for any other standard windows application or utility.

Free Software Downloads

Freeware is a term usually used on internet to describe or promote software downloads which are totally free for use. On the other hand you can find software that are free to download. Free to download does not specifically means that you will be able to use the software application or some other software service for free. Free to download means that you can download the software for free and you are not required to pay anything for downloading the software. Many Software developers put in lots of efforts for creating and publicizing software application. When offering software application, utilities or any other software based product or service, they want you to try them out for free and in case you are happy with the software, you can pay for the software later and use it as per the licence agreement of the software developer.

Open Source software applications are equally popular on internet and are provided on a free to download and use basis. Open Source applications are many times referred to as freeware applications. As software developers you might ask a question as to why people develop freeware application or utilities. Yes software developers develop software applications that are completely free to download and use for many reasons. The first reason for developing freeware applications is publicity. Freeware applications get much higher publicity as compared to trialware or shareware application. Many blogs or websites have readers looking for freeware applications and they often write a lot about freeware applications. Freeware sites gets lots of visitors from all across the globe and they earn money by advertising. There are lots of advertisers out there who want to publicize their products or services and freeware websites provide a platform for them to place their advertisement. Freeware software developers may be provide customer support or there may be limited customer support offered for the freeware applications.

Shareware or Free to try applications on other hand are offered on a  free to download and try. Apart from shareware applications, software companies also develop adware applicatons which are advertisement supported. The advertisements in adware applications may be displayed by the software when it is installed, after the software installation, in the software itself or when you uninstall the freeware application. It is not only the money that drives freeware applications, many times people develop software applications in order to share an idea or utility that they found useful. There are many reasons for the existence of freeware software applications. Freeware applications often provide limited functionality it works as advertised and in order to unlock other useful features of the software, you might be prompted to pay the software company or something else in return.

Now a days Microsoft is offering free download of Windows 8. This does not mean that Windows 8 is freeware operating system. The version of Windows 8 offered by Microsoft currently being offered by Microsoft is sort of trial and it will expire in future at some date. Yes Microsoft offers free download of fully functional trial version of the operating system as well and in case Microsoft follows the trend for Windows 7, they will offer a free 90 days trial for Windows 8 as well. The same applies for other software applications or utilities. Many times the free to download and try applications are often limited in the functionality they offer, limited in terms of how many times the software application can be used for limited number of days for which the software can be used for free.

Windows 8 Start Menu

The Start Menu of Windows 8 has been changed totally in the current version of Windows 8. The Older Microsoft versions had a long and useful Start Menu, however in Windows 8, Microsoft is trying to promote the new Metro GUI interface. The Start Menu in Windows 7 and older versions can be invoked by either pressing the Windows Key on keyboard or by clicking on Start Menu button of the Taskbar. The Taskbar in Windows 8 can be moved at either corner of the desktop by dragging it. In Windows 8 the traditional Start Menu is not present and Microsoft says that the next version of Windows 8 will have better interface for navigating on Desktop.

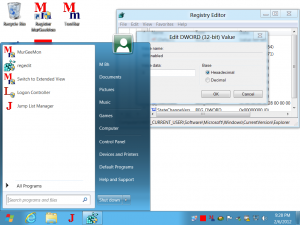
Start Menu of Windows 8 made the Windows 7 Style

Start Menu of Windows 8 made the Windows 7 Style

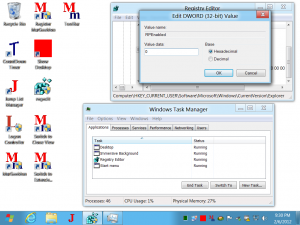
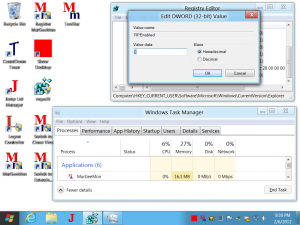
In case you would like to use the old start menu in Windows 8, there is a simple registry tweak as displayed in the above screenshot. The Registry tweak can be used for the signed on user and once activated will invoke the traditional start menu on the press of the Start Menu button in Windows 8. On the press of Windows Key on Keyboard, the Start Menu will be displayed as well but the Metro UI will get invoked and will hide automatically as well. There is a downside of enabling the old start menu in Windows 8 using this registry tweak. Once the Old Start Menu is enabled, the old Task Manager will get enabled as well and when you invoke the Task Manager, the old task manager will run instead of new feature rich Task Manager of Windows 8 as displayed below.

Old Task Manager on Windows 8

Registry Hack to Enable Old Task Manager in Windows 8

In order to apply this Registry Tweak in Windows 7 to enable the Windows 7 style Start Menu and Windows style Task Manager, you would not need to sign off and sign in again. In case you are comfortable in handling the Registry Editor, switching between Windows 7 style interface and Windows 8 interface should be in a matter of seconds. In case you would like to see the Windows 8 the Metro UI style, all you need to do is revert abck the registry change and the brand new task manager of Windows 8 will appear next time you invoke the Task Manager and your Start Menu would be replaced by the Metro User Interface in Windows 8.

Registry Hack to Switch between Windows 7 and Windows 8 Style Interface

Registry Hack to Switch between Windows 7 and Windows 8 Style Interface

Yes this version of Windows 8 is not a final version and the next version of Windows 8 may see improvements in the Start Menu and other Desktop Management graphical user interface. You can have a look at more Screenshots of Windows 8 and know what all new is provided by Microsoft in this new version of Windows 8. In case you do have a good internet connection and want to  install windows 8 on your own computer you can Download Windows 8 totally for free from Microsoft Website. As new version of Windows 8 arrives, many more registry tweaks will be available and will be presented on this website.

Control Caps Lock, Scroll Lock, Num Lock and Insert Key

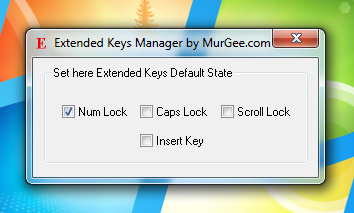
Manage and Control Caps Lock, Scroll Lock, Num Lock and Insert Key on Keyboard connected to a Windows Computer easily with Extended Keys Manager Utility. The Software can be used as an alternative also in case any of the Keys do not work on a Keyboard or even on a Laptop Computer. The Screenshot below displays the Screenshot of the Software taken on a Windows 7 computer. The Extended Keys Manager utility has check boxes for each of the keys which can be controlled with the software utility. As displayed below the checkbox marked with Num Lock is checked which implies that when the software utility was started, the Num Lock was enabled.

Control Caps Lock, Scroll Lock, Num Lock and Insert Key with Extended Keys Manager

Control Caps Lock, Scroll Lock, Num Lock and Insert Key with Extended Keys Manager

The Setup of the Software utility also adds the software to Windows Startup so that whatever keys you check will be on and corresponding LED on Keyboard will be lit (apart from the Insert Key which does not have an LED on the Keyboard). With Windows 7 onwards computers such as Windows 8, any application can be pinned to the Taskbar. In case you do have a keyboard on which either of the Num Lock, Caps Lock, Scroll Lock or Insert Key does not work, this software can be used as an alternative. In case you do not want the software to be started at startup, you would need to manually remove the corresponding entry in the registry using msconfig or any other appropriate tool.

The Software has been tested on Windows 7, Windows 8 and even on Windows XP and it sets up the keyboard keys as configured in the Extended Keys Manager Utility. The software utility is a shareware application which implies that you are free to download the utility and try it until the evaluation usages of the software utility are completed. Yes Keyboards are now a days really cheap to buy, however changing keyboard on a laptop computer can be avoided using this software utility as an alternative to broken Caps Lock, Num Lock, Scroll Lock and Insert Keys. In case you do want to control any other key on your keyboard with this software utility an email to the support team can do the job. Although the setup adds the application to startup, the application is supposed to only set the states of few keys on keyboard and hence it exits automatically from the memory. During the software installation, you will have an option to create a shortcut on Desktop with which you can launch the software or you can even launch the software utility from the programs menu. Controlling Scroll Lock, Caps Lock, Num Lock, etc keys can be really easy with this software application, just check or uncheck the appropriate checkbox and the software will do the job irrespective of whether the keys work fine on your physical keyboard or not.

Monitor Switcher

When using Multiple Monitors connected to a Windows computer, the Monitor Switcher can be used to switch mouse cursor between different monitors. Switching between various monitors in Windows can be really difficult and the Monitor Switcher feature of the software presented here  can make the task of switching between monitors really easy. This functionality is useful when using multiple monitors connected in Extended Mode on Windows computers such as Windows 8, Windows 7, Vista, etc. When using multiple monitors in clone mode or when using a Monitor Switch, this functionality might not be useful, however you may like to checkout other features of the MurGeeMon software.

Switch between different Monitors on a Windows Computer

Switch Mouse Cursor between different Monitors using Monitor Switcher

Whether you are using a Single Monitor or Multiple Monitors connected to your Windows Computer, the Applications accept input in same ways. Applications accept input from user using Keyboard & Mouse input. When providing Mouse Input (in the form of clicks, double clicks, etc) to applications, the operating system switches the focus to that particular application and the application with focus receives the mouse input and processes the input provided to it.

Multiple Monitors on Windows Computer are arranged in a bigger virtual desktop. The Arrangement of the Monitors decides how to move mouse cursor from one monitor to the other. In case you have large number of monitors connected to your Windows computer, it can be really hard & time consuming to move the mouse cursor to various other monitors and the Monitor Switcher functionality presented here offers a Configurable Keyboard Shortcut to switch Mouse Cursor to other Monitors connected to the Windows Computer.

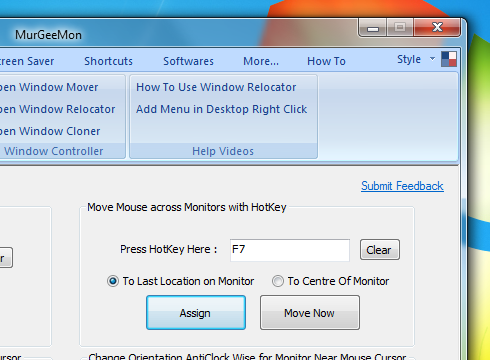
As displayed in the above figure, the Monitor Switcher has been configured to move the mouse cursor to the next monitor on the press of keyboard shortcut F7. Yes this keyboard shortcut is configurable and can be changed or removed with ease. You also have the option to decide how the Monitor Switcher should locate the Mouse Cursor onto Other Monitors. You can select either of the two available options for placing the mouse cursor on other monitor. The first option is to place the Mouse Cursor to the last location on the monitor and the second option is to place the Mouse Cursor at the center of the Monitor.

This Monitor Switcher will not move any application windows to other Monitors. It will just place the Mouse Cursor to the next Monitor in Monitor Chain of a Multiple Monitor Windows Computer as configured. Yes the software presented can be used to move application windows to other monitors as well, but you would need to create a different shortcut for that purpose from the Shortcuts tab of the Dual Monitor Software. Benefits of using Monitor Switcher is that you can reduce hand movements to move mouse cursor across monitors. In order to navigate to other Monitors, all you would need to do is press the Keyboard Shortcut configured and then you can use the hand movements to interact with the operating system or application windows. The Monitor Switcher works on Windows 7 , Vista and other Windows computers and is fully compatible with Windows 8. The same software download works for 32 bit and 64 bit versions of windows, download the software now and use Monitor Switcher to switch between monitors easily, quickly and save your time and efforts.