Desktop Shortcuts

Desktop Shortcuts are really easy way to launch applications, documents, URLs, etc. In case you do use dual or multiple monitors connected in extended mode to your windows computer and frequently turn specific monitor(s) on or off or even change monitor resolution, the desktop shortcuts can be a real nuisance. Saving Desktop Shortcuts Location, Restoring Desktop Shortcuts Location provides some help but may not be really productive and you might be wasting lots of time managing desktop shortcuts instead of actually using them. The Software presented here can be used as a Desktop Shortcuts alternative and can really help you to see what’s inside a specific folder, allow you to launch applications, documents or whatever else a desktop shortcut can do and provide your selected shortcuts a easy and quick shortcuts management way.
Manage Desktop Shortcuts Easily

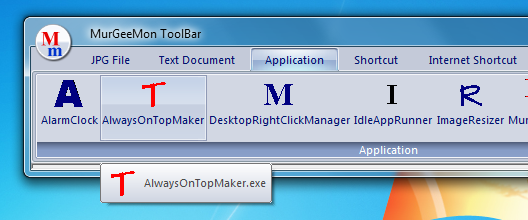
The Application presented above can be used as a Desktop Shortcuts alternative and can be really save you time looking for the appropriate shortcut, file or any other document. The Application looks for all files from a selected folder and then displays them categorised by file type. As displayed above, the configured folder has JPG files, Text Document files, Applications, Shortcuts, Internet Shortcuts and other types of files present in the configured folder.

Icons of every file type and file name are listed as buttons in this software application. Buttons when clicked will open up the document using default windows behaviour. This application makes desktop shortcuts or shortcuts in any other folder portable. You can easily move around the application to any desired location and next time the application when started will start at that particular location. Yes this desktop shortcuts alternative application is resizable as well and can be really handy whenever you need to launch applications or documents.

Yes Windows Explorer allows to display icons categorised by File Type, File Size, Name, etc. However managing desktop shortcuts can become really difficult when you want to launch applications from non primary monitors or when you change display resolution, it can become really difficult to find and rearrange the desktop shortcuts so that you can use restore them to their original position.

Irrespective of which Microsoft Operating System you are using or planning to use, the Desktop Shortcuts management is the same in all Windows Versions. The same Desktop Shortcut Management functionality existed in Windows XP and now Microsoft is launching Windows 8 with almost the same Desktop Shortcuts functionality. This Desktop Shortcuts Alternative works fine 32 and 64 bit versions of  Windows 7, Vista, Windows 8 and even on Windows XP and is available for download with MurGeeMon software which provides lots of desktop and window management features.
Dual Monitor Setup

Setting up Dual Monitors in Windows 7 and Windows 8 is really easy. In order to setup dual monitors with your windows computer, you would need to fulfill the hardware requirements. The hardware requirements of having and using dual monitors connected to a windows computer depends on how you want to use your dual monitors. In case you only need to duplicate output on both monitors, you have two options. Either get a VGA Video Spiltter or get a Dual Monitor Graphics Card. There are benefits of each of the options. In case you opt for a Dual Monitor Graphics card you can even extend your display onto both the monitors connected and move mouse across the monitors. In case you opt for  a VGA Video Spillter, it can be really easy to use and setup.

Setting and using Dual Monitors with a graphics card can require some help. This post will further describe provide information on how to setup and use dual monitors on Windows computer connected using a dual monitor graphics card. This post will further take Windows 7 as an example and will provide screenshot of display settings to show how you can use, control and configure the monitors connected to a Windows 7 computer. Windows 8 uses almost the same nomenclature and similar user interface will be there when setting up dual monitors on a Windows 8 computer. Other Operating systems such as Windows XP  use a different type of graphical user interface.

On Windows 7 Starter Edition you will not be able to extend monitors even when connecting dual monitors. Hopefully Windows 8 will have a similar edition with probable name Windows 8 Starter Edition. Microsoft says that the Starter Edition is targeted towards low end laptop computers and hence the ability to extend monitors is not available in Windows 7 Starter Edition and probably the same will apply for Windows 8 Starter Edition.

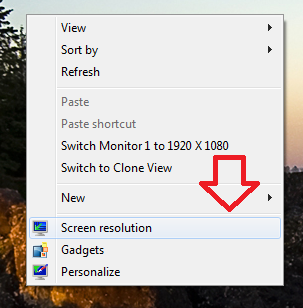
Once you have connected the appropriate power and data cords from and to the monitor, switched computer and monitor on, you are now ready to go ahead and explore the power of having dual monitors on your Windows 8, Windows 7, Vista or any other Windows version. The instructions remains the same whether you are setting up dual monitors on a Desktop or Laptop Windows computer. As mentioned above this post will provide screenshot of a Windows 7 computer which is not a Windows 7 Starter Edition. Now find an empty space on your desktop, right click on it and click on Screen Resolution as displayed below.

Right Click on Desktop of a Windows 7,8 or Vista Computer and Select Screen Resolution

In case you are using Windows 7, 8 or even a Windows Vista computer, there are really good chances that you might not need to install any Display Driver and the complete Dual Monitor Setup will be really easy and quick to setup and use. However in case you are prompted to install a display driver, then internet is your helping tool, find the appropriate graphics driver, download it and install it and then follow the rest of the instructions.

Microsoft is understanding user’s need of having dual monitors connected to a windows computer and hence they are providing more and more features in their operating systems. Windows Vista did had support for dual monitors and when Microsoft released Windows 7, they provided improved support for developers to create Dual Monitor Software so that developers can provide more and more functionality related to dual monitors on Windows Computers.

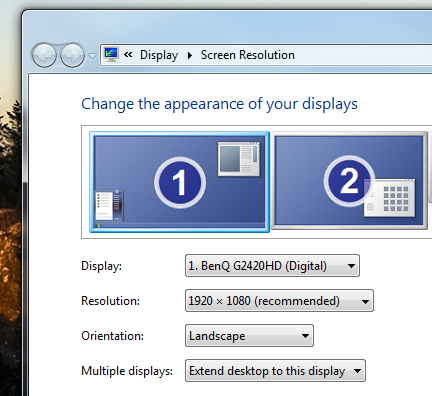
On a Windows 7 computer, the monitors are treated by numbers. The Monitors are numbered according to their physical connections to the CPU of the computer and hence depending on which monitor is connected to which port of the graphics card. On a Dual Monitor Computer with Dual Monitor Graphics Card, one Monitor will be numbered as Monitor Number 1 and other will be numbered as Monitor Number 2. In case you do change the data cords to the monitors, you will get the appropriate numbers of the monitors. Have a look at the given below figure which displays a Windows 7 Dual Monitor Setup Computer. The Screen Resolution of Windows 8 computer will be the same, however for Vista and XP, it will look different.

Dual Monitor Windows Computer

In the Screen Resolution Window, you can have a look at how your Dual Monitors are Setup / Configured. Here you can switch the Monitors into Clone Mode in which both the Monitors will display the same Desktop at the same resolution. Depending on the Graphics Card, Physical Monitor and the Display Driver, the clone mode will select the minimal screen resolution supported by both the monitors and will display the Desktop on both. However you can have different resolutions for both the monitors when having the monitors connected in Extend Mode. As displayed in the figure above, the Multiple displays section should read Extend desktop to this display on the monitor’s settings.

On a Windows 7 Computer, the Start Menu is displayed on the first monitor by default. Windows 8 however allows changing the Start menu to any other Monitor connected to the Windows Computer in extended mode. MurGeeMon provides quick way to change the Primary Monitor (The Monitor on which Start Menu and Taskbar is displayed ), switch to clone mode or to extend the monitors, switch off one of the monitors connected to a Dual Monitor Windows Computer and much more.

Screenshot of Only Main Monitor

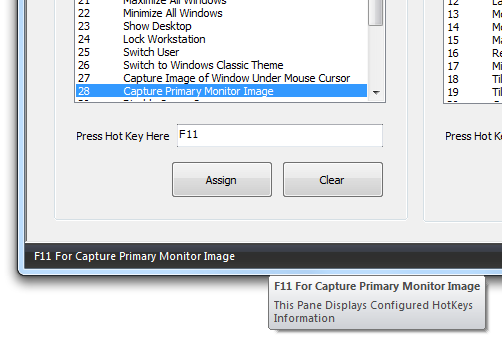
Do you want to capture screenshot of main or primary monitor only on a dual or multi monitor windows computer ? The Software presented is a free to try and $5.00 to register software application which can be really helpful when using dual monitor windows computer. Yes there are many features in the software that can be useful for a multi monitor windows computer. In order to capture screenshot of the main monitor only, the Dual Monitor Software provides two options. The first option to capture screenshot of primary monitor only is displayed as below.

Capture Main Monitor's Screenshot on a Dual or Multiple Monitor Windows Computer

The Screenshot above displays list of shortcuts and one shortcut configured to capture screenshot of the primary monitor only. The primary monitor on a Windows computer is the Monitor on which the Start Menu and Taskbar is displayed in a Windows 7, Windows Vista and Windows XP computers. On Windows 8, the start menu is displayed on the primary monitor, however the taskbar can be displayed on all other connected monitors. The Keyboard Shortcut configured in the software can be used to capture screenshot of the main monitor on all windows versions including Windows 8, 7, XP a, Vista , etc.

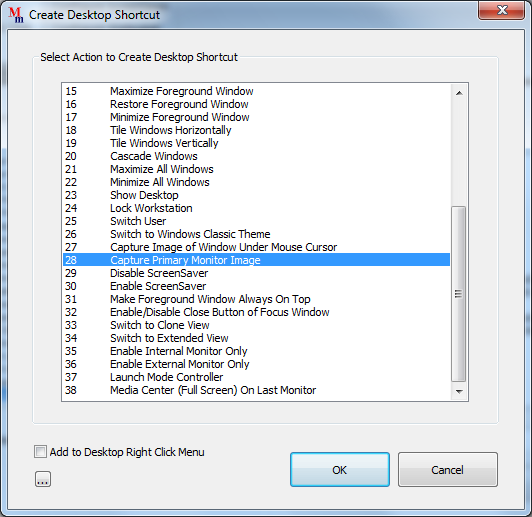
Capture Screenshot of Main Monitor with a Desktop Shortcut

Apart from Keyboard Shortcut, you can also create a desktop shortcut to capture main monitor screenshot on a Multiple Monitor or Dual Monitor Windows Computer. Yes this shortcut can also be added to the right click of the desktop as well. You can also create many other useful shortcuts on desktop to control your dual or multiple monitors as displayed in the screenshot above. The Desktop Shortcut to capture main monitor screenshot can be created on a Windows 8, Windows 7 and other windows versions as well.

Reduce file size of jpeg or any other picture / image

Looking to resize file size of a jpg, jpeg or any other image file ? This post has a solution for reducing image size for Windows users. The file size of a image file or a picture can be reduced by degrading the quality of the image or by resizing it to other suitable image size. In case you have captures images from your high resolution mobile or digital camera, would you like to reduce the quality of the image ? Yes that does not sounds like a great idea, however the Image Resizer software presented here has got an alternative for you. Instead of reducing the quality of the image, reduce the image size. In case you have captured high resolution images with a let’s say 5 Mega Pixel Camera, or even a digital camera with 10 Mega Pixel or may be more, one thing to understand is that the image size in pixels can be very large as compared to your display resolution. Peek into the file properties and find out what’s the size of the image in terms of pixels. In case it is really large , the Image Resizer software can be helpful to reduce the picture size and in turn picture file size on the disk.

Reduce Image and File Size of JPG, JPEG or other Picture Files

Reducing the Image Size will in effect reduce the file size of the image or picture file. In case you do have multiple still pictures captured using a Digital Camera or Mobile Camera, and you want to send the files by email, this option of reducing the image size can really make the things fast. When you resize the images using this Image Resizer, the original images remains with the old sizes and new files are created with reduced image sizes. Download the free trial of Image Resizer, install it on your Windows 8, Windows 7, Vista , XP or any other Microsoft Operating System to reduce file size of multiple pictures easily and quickly.

Color to Grayscale Converter

Converting single or multiple Colored Images to GrayScale is now just few clicks away. There is no need of an expensive image editor or complex procedures to be followed. The Image Resizer can be used to convert color images to grayscale really easily and quickly. All you need to do is launch the Image Resizer Software, look at the bottom of the software where you will find an checkbox labelled Convert Images to GreyScale, Check the Checkbox and then select the colored image to be converted to grayscale and click on the Convert button to convert the selected image to grayscale. In order to convert multiple images to grayscale using the inbuilt image converter, just drag the selected images / pictures and drop them onto the main screen of the Image Resizer.

Convert Multiple Colored Pictures or Images to GrayScale using Image Resizer Software

The Image Resizer has lots of other useful image editing features as well and works fine on Windows 8, 7, Vista and XP. Whether you are using a 32 bit Windows or 64 bit Windows, this Image Resizer will work fine and will seamlessly convert Colored Images to GrayScale using the inbuilt converter. You can even resize the output images to any selected resolutions apart from converting images. Note that the term Black & White is different than GrayScale and as of this writing the Image Resizer can be used to convert colored images to grayscale only.

Rotate Multiple Images or Pictures with Windows Software

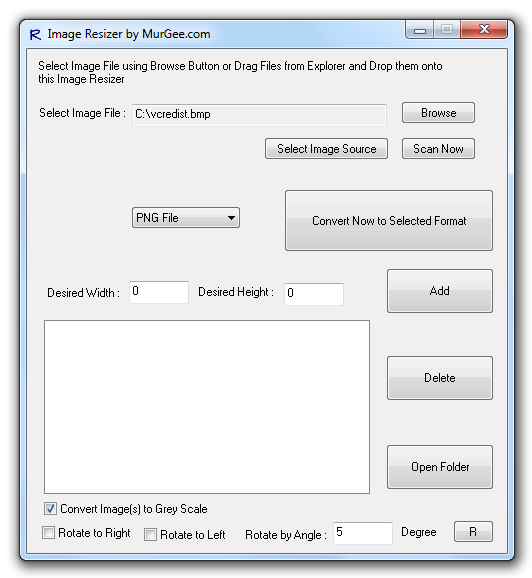
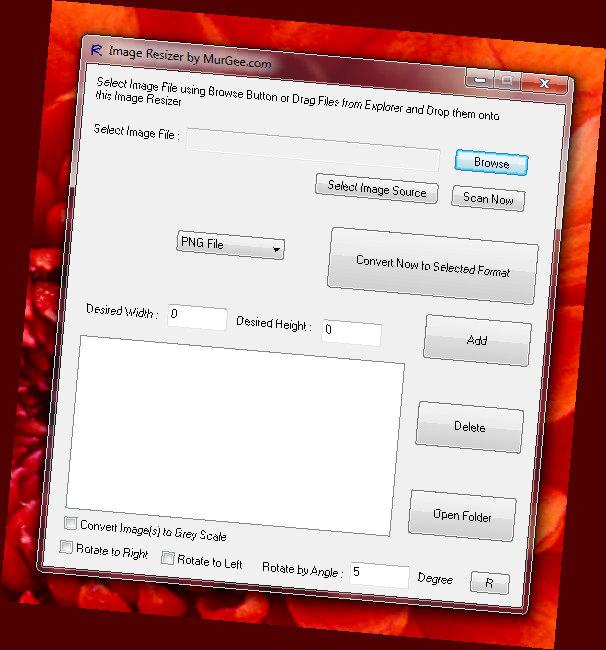
Another useful feature of the Image Resizer Software is to rotate single or multiple images easily and quickly. There are many options available in the software to rotate single or multiple images. You can either opt to rotate single or multiple images to the right or left and you can also define an angle at which the Image Resizer must rotate the images. As displayed below the Screenshot of the Image Resizer was rotated by 5 degrees and output image file type was selected as png.

Resize Multiple Images / Pictures with a Simple Drag Drop on Windows 8, Windows 7, Vista, etc

As you will notice the above image is rotated using the software. Note that the Image Resizer automatically took the appropriate background of the new image which if required can be changed using any image editor. Rotating Multiple Images on a Windows Computer with a small software download can really save your time and efforts. Yes the output image you get depends more or less on the image you want to rotate and the angle at which you want the images to be rotated.

Multiple Images to be rotated in a batch at once can be of any type including .bmp, .jpg, .jpeg, .png or almost any other image type found on Windows. Before dropping multiple images onto the Image Resizer, you would have to specify the output image file format (which can be any of the .jpg, .png or gif file types). Download free trial of the Image Resizer now and give it a try with your images. There are no reminders or popups in the software to ask for registration key or serial number. The trial version is just usage limited version and will work as good as full version untill the free trial usages of the software have been completed. The Image Resizer can be used on Windows 8, Windows 7, Vista or even on Windows XP and it will work good.

Resize Multiple Images Windows 7, Windows 8, and other Windows Versions

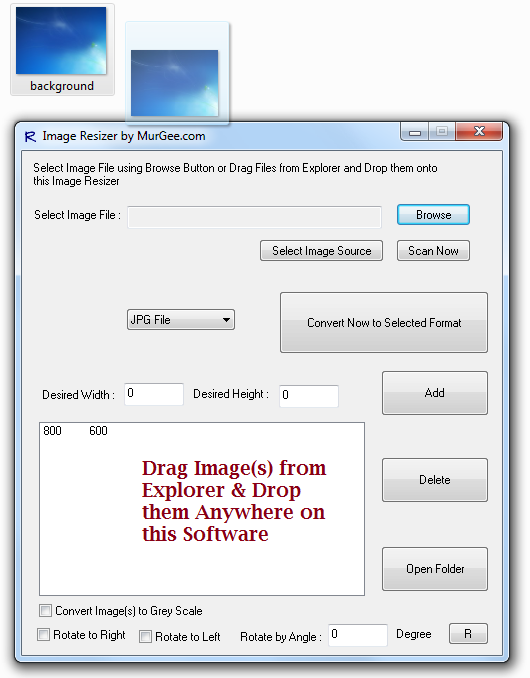
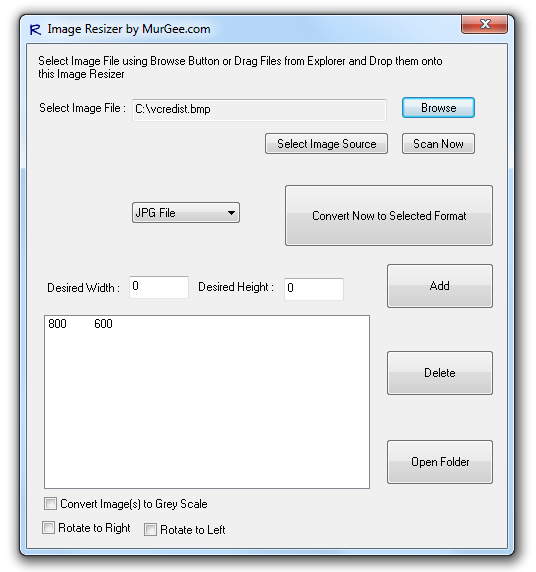
Resizing Multiple Images is now really easy and just requires a simple drag / drop. As displayed in the figure below select single or multiple images from Windows Explorer and drop them onto the software and that’s it. A Windows Explorer Window will open up automatically containing the resized images. In case you are wondering what would be the new size of the images ? Have a look at the software closely and you will find new image resolution listed in a long list titled 800 600. Yes this Image Resizer allows you to resize multiple images (image format can be almost any image format including BMP, JPG, JPEG, PNG, TIFF, GIF or almost any other image format) to multiple resolutions really easily and quickly.

Resize Multiple Images to Multiple Resolutions / Sizes

One Click to launch the Image Resizer, navigating to the folder in windows explorer, select the image files file(s) of any type including .bmp, .jpg, .jpeg, .png, .tiff etc and drag them to the software and new resized images with new names (including the new image size) will be created automatically and the folder will show up. Resizing Multiple Images to Multiple Sizes was never so easy and quick to do. Yes you would need to specify the target image resolutions and the intended image type before dragging the image files onto the software for resizing the images.

Whether you want to resize bmp files, jpg files, jpeg files, png files or any other type of files to multiple resolutions or just conversion, you will find this Image Resizer really easy to use. Yes the software works well on Windows 8 which is the latest operating system from Microsoft , so in case you do plan to upgrade your current windows operating system to the new one, you will find this Image Resizer working for you always. Download the free trial of Image Resizer, give it a try and in case you do find any feature missing, do write to the support team and probably get this Image Resize more useful and easy for your image resizing tasks.


Image Scanner for Windows 8, Windows 7, etc

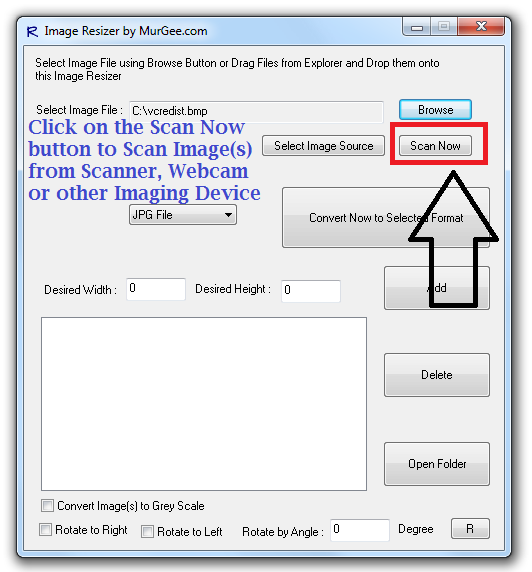
Scanning an image from a Scanner can be really useful and when you are equipped with Windows 8, Windows 7, XP or Windows Vista, the software utility presented here can be a really handy utility to do the scanning. In order to scan an image all you need to do is launch the software and click on the scan button. Yes ofcourse prior to scanning images or documents you must have an appropriate scanner connected to your computer using a USB or other appropriate port. The way in which this Image Scanning software works is by using a functionality known as TWAIN which works with scanners and even webcams. Irrespective of the scanning hardware you have got connected to your computer, the software presented here can be used to quickly scan, store and save the scanned images to jpg, bmp, png or even gif file formats.

Scan Images using Scanner, Webcam, etc on Windows 8, Windows 7, XP, Windows Vista, etc.

Download the Image Resizer Software, install it on your Windows 8, Windows 7, Windows Vista or other Microsoft Windows version. Install the Image Resizer software on your Windows Computer and finally launch the software using desktop shortcut or programs menu. In case you do have the appropriate Scanner Drivers installed, all you need to do to start the image scanning is click on the Scan Now button and then follow prompts. Depending on the Scanner, you will get the appropriate graphical user interface to continue the scanning. In case you would like to select one of the available scanners, click on the Select Image Source button and select the appropriate Scanner, Webcam, etc. This might work with a Digital Camera however, the software has not been tested yet with a Digital Camera. Yes this Image Scanning software has been tested on Windows 8, Windows 7, and Windows Vista and works well with 32 and 64 bit versions.

BMP to JPG Converter

Bitmap files have a .bmp extension and have the highest possible resolution. The Software presented here can be used as a bmp to jpg converter. The Software allows to convert single or multiple .bmp files to .jpg files really easily, quickly and the conversion is done really fast. A Batch File conversion can be done by just dragging .bmp files onto the software and on the click of the convert button. You can even use the software to convert .bmp files to .png or .gif as well. Converting bmp files to jpg, png or any other format when done with a desktop software utility can be really fast as compared to the conversion done using an online bmp to jpg converter.

BMP to JPG Converter Software

The File Conversion is one of the features of the Image Resizer Software Utility. Single or Multiple bmp files can be dropped onto the interface of the software and the Convert Now button can do the required task of converting bmp files to jpg files in a matter of seconds. The Software can also resize the images if appropriate image resolutions are added to the list of target image resolutions. Initially the software presents the options to resize image files to 800 by 600 resolution apart from doing the image conversion. Just Select the 800 X 600 Resolution and click on the delete button if you do not want your images to be resized and converted.

Just drag bmp files from windows explorer and drop them onto the software and then click on the Convert Now button to convert bmp files to jpg files. There is no limit in the number of files that can be converted and there are no reminders to purchase the software. The Software is free to download and try and works fine on almost all latest versions of Microsoft Windows including Windows 8, 7 ,  XP ,  Vista ,  etc. Download this multi-purpose Image Editing tool and use it as bmp to jpg converter to convert any number of bmp files to jpg files in a batch.

Features of Image Resizer

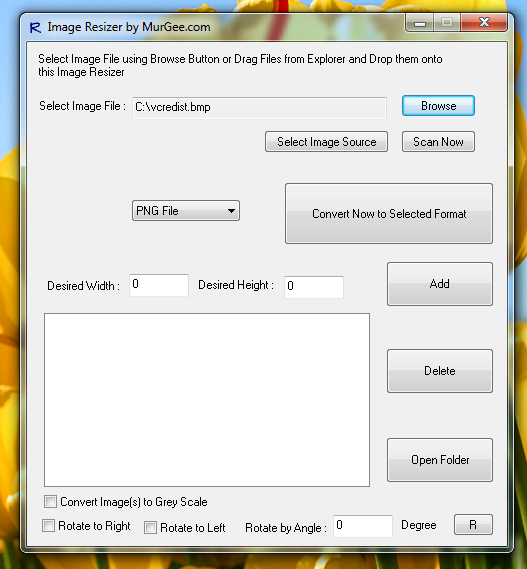
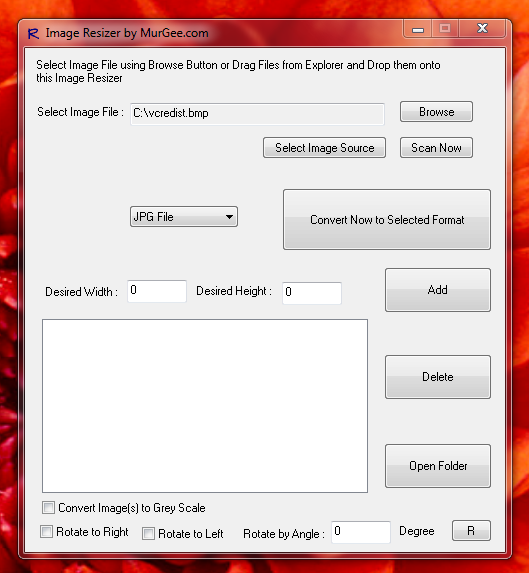
The Image Resizer has now lots of new features apart from resizing selected images. Now the new Image Resizer can be used to scan images from a scanner, convert images to greyscale, rotate  the image or converted images to right or to left. As with initial version, this new interface of the Image Resizer has a single screen interface and can be minimized to system tray. As before multiple image files can be dropped onto the interface to for image conversion and resizing. Given below is the screenshot of the Image Resizer Utility. In order to download free trial of the software please do visit the Image Resizer page, download the software and resize images quickly and easily.

Image Resizer works on Windows 7, Windows 8 and other Windows versions of Microsoft

  • Select Single File for Resizing using the Browse for File Dialog.
  • Drag Drop Multiple Image files to the Image Resizer to resize multiple image files.
  • Scan Image from Scanner and convert or resize the selected image.
  • Scanner Selection options to select the Image or Photo Input Electronic device such as Scanner, Webcam, Camera or any other Photo Capturing Device.
  • Convert & Resize Images to Grey Scale.
  • Rotate selected image(s) to right or to left using options provided in the main interface of Image Resizer.
  • Image Resizer works with Windows 8 32 bit and 64 bit versions.
  • The Image Resizer has been tested with Windows 7’s 32 and 64 bit versions.
  • Yes the Image Resizer works on Windows Vista, and Windows XP as well.
  • The Image Resizer is totally free to download & try.